Showing posts with label Change. Show all posts

Tuesday, October 1, 2013

How To Change "Post a Comment" Text of Blogger Blog

You can see "Post a Comment" text above your comment form in blogger.If you like to replace this "Post a Comment" text with your own creative text follow the steps below.

1. Login to your blogger dashboard--> layout- -> Edit HTML

2. Click on "Expand Widget Templates".

3. Scroll down to where you see this:

Post a Comment


Note: You can find above code in 2 places.

4. Now replace above codes with your own text. For example I replace it with "Give Your's Feedbacks".

Change Post a Comment Text

5. Now save your template and you are done.

Refresh your site to see result.It will look like above image.

Keep Visiting LearnFre for More Tutorials. :)

Friday, August 16, 2013

How to Change Blogger Posts a Comment Message

Change Blogger Posts a Comment Message:Providing People mind at the front side , they don't like any factor too much simple.Making any factor Innovative and Best of fortune is really a work which is significant "If You Can't Create it Excellent simply its look Good".You may have seen the concept "Post a Comment" at the end of Content ,isn't look awkward? I don't Like it ! Then Let's modify it ,Now How to Put it back , these days i will discuss an amazing technique via which you can place your desire picture there.Must apply it On Your Weblog if you love creativeness.

How To Change "Post a Comment Message in Blogger"


  • Go To Blogger Dashboard
  • Click On Template >> Edit HTML
  • Now Search for the below Code


  • You will find the below Code 


  • Now There Replace " " in the above mentioned script to the desired image script or select any code from the below images.

First Image Script

2nd Image Script 

3rd image Script 

 4th Image Script

5th Image Script 

---Replace the Above mentioned Code with any one of these images and enjoy the awesome look of comment section,if you have any Question in your mind ask us freely.Happy Blogging!

How to Change Blogger Posts a Comment Message

Rating: 4.5

Wednesday, July 11, 2012

How to Change Bullet Point Style in Blogger (Blogspot) Lists

In Part 1 of this three part series of Blogger tutorials I discuss how to change bullet point styles of lists you may want to include in Blogger posts. This first Blogger tutorial deals with unordered lists and how these can be styled using CSS in Blogger (Blogspot). The second part of these tutorials will deal with ordered lists while part 3 discusses bullet point changes you can make to your sidebar, footer and menus.

Today you will learn how to:
  • change the style of bullet points in unordered lists
  • add bullet points to unordered lists if they are absent
  • add an image instead of a bullet to lists in your Blogger posts
This tutorial is rated easy and is designed so that even Blogger newbies can make the changes they want to their Blogger template. Changing the bullet point style involves changing the CSS styling in your Blogger template (Blogspot template). Join me as I walk you through this step by step guide. How to Add Bullet Points to a Blogger Post If you are still using the old Blogger editor you will need to add bullet points manually to any unordered lists you create in Blogger posts. If you are using the new editor the work is done for you. Either way though this is the type of code that generates unordered lists:
  • Create your own list markers in Blogger
  • Create unordered lists in Blogger
  • Create bullet points in Blogger
Any text can be placed between the two tags. Simply copy this list into a Blogger post and substitute your text for mine and you will have an unordered list. Circular Bullet Points Circular bullets (also known as markers or discs) are displayed in Blogger by default whenever unordered lists appear. This means that whenever the tags are used in Blogger posts a leader dot or disc will appear before each line of text denoted by
  • . (Note I will discuss ordered lists tags in part two of this tutorial).

    An unordered list in a Blogger post using the tags would appear like this:
    • Change Bullet Point Style in Blogger
    • Add Bullets to Blogger
    • Changing the look of unordered lists in Blogger
    We can make lots of changes to the look of these filled discs or filled circles by changing the CSS styling in Blogger. For instance we can have squares, or we can choose to have no bullet point at all. Here's how. To Add Square Bullet Points to Blogger (Blogspot) The following code will replace the filled circle bullet points with squares instead:
    1. Login to Blogger if not already logged in

    2. From the Dashboard go to Design >Edit HTML

    3. Back up your template

    4. Find the posts section of your CSS stylesheet which will be before ]]> tag

    5. For the following default Blogger templates eg "Simple" add the following CSS code to the post section like this

      .post ul li {
      list-style: square;
      }


    6. Save template and view blog post to see the circular bullet points have been replaced by square ones
    To Add Circle Bullet Points to Blogger (Blogspot) To add unfilled circle list markers or bullet points to Blogger posts do the following:
    1. Follow steps 1-4 as per square bullets

    2. Add the following code to the posts section of the CSS stylesheet of your Blogger template by entering the following code:

      .post ul li {
      list-style: circle;
      }


    3. Save the changes to your template and view a blog post to see the empty circle bullet points
    How To Indent Bullet Points in Blogger There are two ways to increase the indentation of list style markers or bullet points.
    1. Using the Inside or Outside Element
      The indentation of bullet points can be varied using the "inside" element. By default the list will be "outside" unless the "inside element" is used. The following code shifts the indentation of the list further to the right.

      .post ul li {
      list-style: circle inside;
      }


    2. Custom Indentation CSS Styling
      It is also possible to add custom indentation styling to lists. For instance here I have added a 2.5em indent using the following code to the circles example:

      .post ul li {
      list-style: circle;
      margin-left: 2.5em;
      }

    How To Replace Bullet Points with an Image in Blogger (Blogspot) Sometimes you may prefer to have an image list marker or icon instead of a bullet point. You will need to host your image somewhere such as a free image hosting service eg Flickr or Photo Bucket. Follow the steps below to replace bullet points in your Blogger posts with an image
    1. Follow steps 1-4 as per square bullets

    2. In the CSS styling of the posts section of your Blogger template and before the insert the following code:

      .post ul li {
      list-style: url("http://URLaddressofImage.gif");
      }


    3. Replace URLaddressofImage with the URL address of the image you have uploaded to an image hosting service. Note in most cases the file will have a .gif extension. If the extension is anything other than .gif you will need to change this too.


    4. Save the changes to your Blogger template and navigate to a post page to see your image list marker installed
    How to Remove the Bullet Points from Blogger Posts If you are going for a minimalist look you may prefer to have no bullet points in the lists in your Blogger posts. In this case:
    1. Follow steps 1-4 as per square bullets

    2. In the CSS styling of the posts section of your Blogger template and before the insert the following code:

      .post ul li {
      list-style: none;
      }

  • Monday, July 9, 2012

    Blogger Background Image - How to Add or Change in your Blog Template

    In today's Blogger tutorial (Blogspot tutorial) I will show you how to both add a background image to a Blogger template if you don't have one already or change the existing background of your Blogger template.

    I have chosen to write this article not because there aren't any how to articles already on the net but because they assume quite a bit of knowledge. I have taken a different tack with this post in that I assume you are an absolute beginner with no knowledge of Blogger templates.

    For this reason I have provided some sample backgrounds for you to play around with. By just cutting and pasting these images you can see first hand how dramatically adding a different background to your Blogger template can change it. You will see that replacing your background image with these images isn't that difficult and hopefully it will give the confidence to branch out further and change the background of your Blogger template to suit your own needs. All that is needed is to insert a small snippet of code into the CSS styling section of your Blogger template and hey presto your Blogger template will take on a whole new look.

    How to Change the Color of a Blogger Background (Default Templates)
    If you are using a default Blogger template then you already have the option to change the background color to your own taste by going to Layout > Fonts and Colors. Some third party custom Blogger templates have this option too but by no means all.
    For instructions on changing the background color of custom templates see tips and troubleshooting below.

    How to Add a Background Image to a Blogger Template
    1. Log in to Blogger if not already logged in
    2. Go to Layout > Edit HTML
    3. Back up your Blogger template as a precaution by downloading the full template to your computer
    4. Find the following line in your Blogger template
      body {

    5. Add the following line directly after this line
      background-image: url(URL address of your image);

      Your block of code will now look like this:
      body {
      background-image: url(URL address of your image);
      (existing code in this block)
      }

    6. Now replace the code in red for the URL address of your image. Choose an image from the selection below to practise with or use your own image. Note if using your own image make sure you read the tips and troubleshooting section below.


      https://blogger.googleusercontent.com/img/b/R29vZ2xl/AVvXsEjmjo5jDq9tUnIOcLmrWyYG4qKPo_uEaNFlhEVjoIWEXt2_vRfJXDmRFbZlvMeTP0yHlg4n7O824g_96Wn3zzXbVLtj1-kg4w-_DNx2i1QmjkFRXZE1U72lp0bX3vcXTT1CVTBe5RjuzFs/s320/background_047.gif


      https://blogger.googleusercontent.com/img/b/R29vZ2xl/AVvXsEhunTFJdNTNic2Znj7PDYULkpuY76X3aCWTPUo6_IpypK4kIdCbRbsAOnvW_0celSIBzKMjPvCAW8hbbybFDJxJMny396mI_jSooSXU4knOQT22JRgVCPgSvxm3uTZWeDSGilEG_UayZX0/s320/background_104.gif


      https://blogger.googleusercontent.com/img/b/R29vZ2xl/AVvXsEhW16Gtm_Cofq3IrYoFarkNtU6FtbgItR0cIftpTb98ZjKv5KzwGxpS4dzJCs7u_oRPDKZ5ojN5oI3zQlKLgJox6hnZ2zAR3-Y1ElC-WtMGtEEb-eFp-q3AdMgySa9uTpzSAlMKmbNrPOk/s320/background_126.gif


      https://blogger.googleusercontent.com/img/b/R29vZ2xl/AVvXsEgdofU8LP-IKqv7tqPPqlavgU_bSK23YWZx8w3bUo9nKibYyuk9MgK25DB0_S2ej-wpeKAEoyBjky7Wkhx1VM4sYFxyCmevZUudgSf5VM27FDQq6FYAgHbPvJSe1wPc8V8674CxK8TzWJk/s320/background_073.gif


      https://blogger.googleusercontent.com/img/b/R29vZ2xl/AVvXsEj-FSUz69ZG9tsmnz2BKKWklouRf4rc5-_uMYYKIc0jWzqP06b25TIMR-GTXtuPFBnq9OkfYJyXkvQ-OV9hTu0JcN8TNuyszK7XWMjJOF965wO-9aNEOa5oJOUqplR3t2KpY1jEQutK5Xc/s320/background_083.gif

      Green Paws Background

      https://blogger.googleusercontent.com/img/b/R29vZ2xl/AVvXsEhj2BjJ7cSA7rE_GoF29WJoMuoauMsXzGzk1WWEeD8Ybu3NcQmf0uT2DgVqtq3nGVGm8z3MtblWSCy1wFPweIWSCLwEOayOfzWRHd3E9dLSbxeJ4cTi5GAE1KHmcE5jJ_zdQDswqzRH-8A/s320/green-paws.gif

      Musical Notes Background

      https://blogger.googleusercontent.com/img/b/R29vZ2xl/AVvXsEir92nDLOjytmyEjndzcccOitP-nmpep7d3o1iq0r5la1DF7NrFCH5A2inlaYcuJSMTQklN5RpKSj2HhhuKr9iSIyc3IoPLyxiq5XMqAMLJaOxvGH0OGc5pjhKBtRd15R7OXSWpafeaAio/s320/melody.gif

    7. Use the Preview button to see the effect of these different backgrounds on your template. It will help you get an idea of the kind of possibilities out there.

    8. You are welcome to use one of the above Blogger backgrounds as they are all free to use without any restriction. If you decide to use one of these simply click on Save Template and you are in business. Alternatively go ahead and find your own background image on the net and follow the instructions below to insert it into your Blogger template.
    Tips and Troubleshooting
    • To Add Your Own Image to a Blogger Template
      There are huge number of backgrounds on the net that are suitable for Blogger. Search under free website backgrounds in your favorite search engine to find these.

      Simply download your preferred background and save to an image service like Photobucket, Flickr.

      Make sure the file format is either a .jpg, .gif or .png and that its size does not exceed 100kbs. As a rule of thumb an image size of around 30kb or less is about right if loading time speed is not to be compromised. Larger images can be resized quickly by using an online resizing service such as Shrink Pictures.

      Follow the instructions above to change the URL to that of your image.
    • To Change the Background Color of Your Custom Blogger Template
      If there is no option to change the background color of your Blogger template in Layout > Fonts and Colors you can still change the color manually.

      1. Follow steps 1 to 4 as above

      2. Find the line beginning with :
        background-color: #

      3. The hex color will be different for each template. We will change the color only
        background-color: #change hex color code to your chosen color;

      4. Replace the existing hex color code with the value of your chosen hex color. List of web safe hex colors. For example insert the following code to change the background color to:

        Denim Blue
        background-color: #336699;

        Black
        background-color: #000000;

        White
        background-color: #ffffff;

      5. Use the Preview button to see the effect of each color before you save it.

      6. Once you are satisfied go ahead and click on Save Template
    Today's Blogger tutorial (Blogspot tutorial) aimed at Blogger beginners continues the series on CSS styling for Blogger. You have learned how to add the background image to your Blogger template or change the existing background image. To help you gain confidence in changing the background image I have provided some sample images for you to practise with.
    Also in this Blogger tutorial you have learned how to change the color of your Blogger background if you prefer a plain solid background color rather than a background image. As always if you strike any problems implementing the tips in this tutorial please let me know.

    Sunday, July 1, 2012

    Blogger Post Image Borders Change or Remove

    Sometimes you may want to remove, delete or change the image border of a custom Blogger template or default Blogger template (Blogspot template). In this Blogger tutorial you will learn how easy it is to make changes to your template so that you can get rid of unwanted image borders around all the images that appear in your blog posts or around a single image in a blog post.

    You will also learn how to enhance your Blogger template (Blogspot template) by changing the line color and line style of the existing image borders.

    This Blogspot tutorial is rated easy. It involves making minor alterations to your Blogger template (Blogspot template) but this is well within the capabilities of beginner bloggers and newbies. The changes will take less than 5 minutes to complete and can make the world of difference to your Blogger template.

    Blogger image with border Blogger image without border

    How to Delete, Remove, Get Rid of the Image Border in Blogger Posts
    The following instructions will remove the little border around the images in your Blogger posts.

    1. Login into Blogger if not already logged in
    2. From the Dashboard navigate to your blog. Go to Design > Edit HTML by clicking on the Design tab and then choosing the Edit HTML link
    3. Back up your existing Blogger template by clicking on the Download Full Template button
    4. Find the following code in your Blogger template (no need to check the Expand Widgets Template box as we are only working with the CSS Style Sheet). Note: the code in Blogger templates varies but this is the code you will find on a Blogger Minima template and most other default Blogger templates.


      .post img {
      padding:4px;
      border:1px solid $bordercolor;
      }

      If you do not have this code look for the following:

      img{
      padding: 4px;
      border:1px solid $bordercolor;
      }
    5. There are two ways to get rid of the unwanted border image code. You can either:

      • Remove the following line:

        border:1px solid $bordercolor;
        or
      • Change it to the following
        border:0px;
    6. Click on the Save Template button
    7. Click View Blog to admire your post images minus any image border.

    How to Change the Color of the Image Border Around Posts in a Blogger Template
    The following instructions will show you how to change the color of the border which appears around images in your Blogger posts

    1. Follow Steps 1 to 4 as per removing the image border from Blogger posts.
    2. There are several methods to change the color of the image border but the easiest is to

      • Change the following line:
        border:1px solid $bordercolor;

        to
        border:1px solid #6698FF;

        The above change will make the border line color sky blue. To change the color (in red) to your own color choice replace with the hex color code for your chosen color
    3. Click the Save Template button to save your changes
    4. Click on View Blog to admire the new color around the images in your Blogger posts

    Tips and Troubleshooting

    • To change the image border line style from a solid line to a dotted line change the word solid to dotted eg

      border:1px dotted $bordercolor;
    • To change the image border line style from a solid line to a dashed line change the word solid to dashed eg

      border:1px dashed $bordercolor;
    • To increase the width of the image border change the size from 1px to 2px or 3px eg

      border:3px solid $bordercolor;
    • To Remove The Image Border Around Only One Image paste the following into your image code in your Blogger post:

      style="border:none"
      style="border:none" alt=""id="BLOGGER_PHOTO_ID_XXXXXXXXXXXX" />

    In this Blogger tutorial you have learned how to remove, delete and get rid of the line border which appears around images in your Blogger posts (Blogspot posts). You have also learned how to change the line color of the border image to your own chosen hex color. In addition I have shown you how to change the line style from solid to dotted or dashed and to remove the border around a single image. As always any problems with making these changes please let me know. Good luck!

    Friday, June 29, 2012

    How to Remove or Change the Blog Title Border in Blogger (Blogspot)

    In this Blogger tutorial I discuss how to change the blog title border color or remove the border in a Blogger template (Blogspot template) by changing either the CSS styling of the border manually or by using the Blogger Template Designer feature.
    Lots of bloggers have updated their Blogger template to the new default series of Blogger templates for 2010. There are however many of you who are still using the default Minima template from 2006 (and there are lots of good reasons to do so) so this tutorial is for you and anyone else who is using a custom Blogger template based on Minima.

    Remove or Change the Blog Title Border in Blogger (Blogspot)
    There are two simple ways to remove the border around the blog title in Blogger. We are going to hide the border rather than actually remove the code that creates it by making the border color transparent. I will also show you how to change the border color.

    Method 1 discusses how to do this using the Blogger Template Designer while Method 2 describes how to change the blog title border manually by changing the code.


    Method 1 - Using Blogger Template Designer
    1. Log in to Blogger
    2. From the Dashboard go to Design > Template Designer
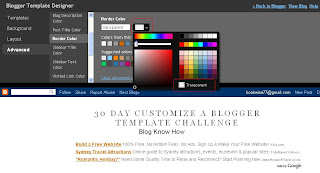
    3. Go to Templates > Advanced > Border Color

    4. Choose the down arrow color picker to activate the color palette window
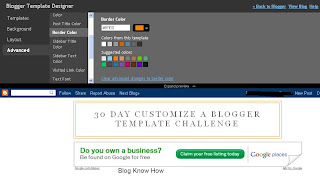
    5. Choose transparent which is below the color palette to remove the border around the blog title completely. You now will see the blog title border disappear. Or choose a new color from the color palette to change the color

      Remove Blog Title Border in Blogger
      Remove Blog Title Border

      Change Blog Title Border Color in Blogger
      Change Blog Title Border Color
    6. Click on Apply to Blog to save your changes


    Method 2
    If the Blogger Template Designer is not working on your template for some reason you can tweak the code in your template to remove the border around the blog title

    1. Log in to Blogger
    2. From the Dashboard go to Design > Edit HTML
    3. Back up your Blogger template
    4. Find the border color variable which will be near the top of the template code

    5. Change the border color value to transparent to remove the border altogether so that your code now looks like this:

      type="color" default="#ccc" value="transparent">

      or change the value to a color of your choice eg

      type="color" default="#ccc" value="#ff7f00">
    6. Save your template and view your blog to see that the border around the blog title has been removed or changed color

      Remove Blog Title Border CSS Styling in Blogger


    Tips and Troubleshooting
    Below are some tips to help you further customize the blog title border width. You can either remove the inner border, thicken the outer border or thicken both borders around the blog title in Blogger.

    1. To change the width of the border around the blog title in Minima change the following:

      #header {
      margin: 5px;
      border: 1px solid $bordercolor;
      text-align: center;
      color:$pagetitlecolor;
      }

      to

      #header {
      margin: 5px;
      border: 10px solid $bordercolor;
      text-align: center;
      color:$pagetitlecolor;
      }

      This code increases the border width from 1px to 10px
    2. To remove the inner border around the blog title in Minima change the code to the following:

      #header {
      margin: 5px;
      border: 10px solid $bordercolor; (remove this line)
      text-align: center;
      color:$pagetitlecolor;
      }
    3. To increase the width of the outer border around the blog title in Minima change this code

      #header-wrapper {
      width:660px;
      margin:0 auto 10px;
      border:10px solid $bordercolor;
      }

    In this Blogger tutorial you have learned two methods to change the color of the border around a blog title in Blogger blog (Blogspot blog). I have also shown you how to increase the size of the border width. This tutorial applies particularly to the default Blogger template Minima but also is relevant for any blogger using a custom Blogger template based on Minima. Good luck!


    horizontal random post

      Random Posts...!!!