Showing posts with label Remove. Show all posts

Wednesday, September 25, 2013

Remove Navbar From Blogger

What is Blogger Navbar and Why Remove It?

Blogger has got various features of which one is a default Navigation Bar. It is a tiny strip on the top of your blog in which there are many buttons and a search field. Most of the bloggers hate the navbar. When you are blogging, Navbar can be useful thing, but sometimes,
you find it annoying and you really want to get rid of it. The main disadvantage of this bar is visual. If you have got a customized design, Navbar usually doesn't fit in. The two main reasons to remove the Navbar are:

1. Your Blog appears more professional 
2. It provides you with more space at the top for graphics

How to Remove It?

Most people who host their blogs on Blogger whine about the inability to remove the blogger navigation bar via their elements page. Well, now if you still want to use blogger’s template and remove the blogger navbar then just follow the simple trick.

1. Login into your blogger blog. 
2. Go to template and click on Edit Html 
3. Now search  and paste the following code just after it.

#navbar-iframe { display: none !important; }

4. Save your blogger template and you have managed it.
  
Hopefully you will like this article same as our previous posts. We always give respect to our reputable readers by providing the latest and informative knowledge. Again if you need any assistance or tips feel free to contact and visit http://learnfre.blogspot.com. We always appreciate your advises and comments.

Sunday, July 1, 2012

Blogger Post Image Borders Change or Remove

Sometimes you may want to remove, delete or change the image border of a custom Blogger template or default Blogger template (Blogspot template). In this Blogger tutorial you will learn how easy it is to make changes to your template so that you can get rid of unwanted image borders around all the images that appear in your blog posts or around a single image in a blog post.

You will also learn how to enhance your Blogger template (Blogspot template) by changing the line color and line style of the existing image borders.

This Blogspot tutorial is rated easy. It involves making minor alterations to your Blogger template (Blogspot template) but this is well within the capabilities of beginner bloggers and newbies. The changes will take less than 5 minutes to complete and can make the world of difference to your Blogger template.

Blogger image with border Blogger image without border

How to Delete, Remove, Get Rid of the Image Border in Blogger Posts
The following instructions will remove the little border around the images in your Blogger posts.

  1. Login into Blogger if not already logged in
  2. From the Dashboard navigate to your blog. Go to Design > Edit HTML by clicking on the Design tab and then choosing the Edit HTML link
  3. Back up your existing Blogger template by clicking on the Download Full Template button
  4. Find the following code in your Blogger template (no need to check the Expand Widgets Template box as we are only working with the CSS Style Sheet). Note: the code in Blogger templates varies but this is the code you will find on a Blogger Minima template and most other default Blogger templates.


    .post img {
    padding:4px;
    border:1px solid $bordercolor;
    }

    If you do not have this code look for the following:

    img{
    padding: 4px;
    border:1px solid $bordercolor;
    }
  5. There are two ways to get rid of the unwanted border image code. You can either:

    • Remove the following line:

      border:1px solid $bordercolor;
      or
    • Change it to the following
      border:0px;
  6. Click on the Save Template button
  7. Click View Blog to admire your post images minus any image border.

How to Change the Color of the Image Border Around Posts in a Blogger Template
The following instructions will show you how to change the color of the border which appears around images in your Blogger posts

  1. Follow Steps 1 to 4 as per removing the image border from Blogger posts.
  2. There are several methods to change the color of the image border but the easiest is to

    • Change the following line:
      border:1px solid $bordercolor;

      to
      border:1px solid #6698FF;

      The above change will make the border line color sky blue. To change the color (in red) to your own color choice replace with the hex color code for your chosen color
  3. Click the Save Template button to save your changes
  4. Click on View Blog to admire the new color around the images in your Blogger posts

Tips and Troubleshooting

  • To change the image border line style from a solid line to a dotted line change the word solid to dotted eg

    border:1px dotted $bordercolor;
  • To change the image border line style from a solid line to a dashed line change the word solid to dashed eg

    border:1px dashed $bordercolor;
  • To increase the width of the image border change the size from 1px to 2px or 3px eg

    border:3px solid $bordercolor;
  • To Remove The Image Border Around Only One Image paste the following into your image code in your Blogger post:

    style="border:none"
    style="border:none" alt=""id="BLOGGER_PHOTO_ID_XXXXXXXXXXXX" />

In this Blogger tutorial you have learned how to remove, delete and get rid of the line border which appears around images in your Blogger posts (Blogspot posts). You have also learned how to change the line color of the border image to your own chosen hex color. In addition I have shown you how to change the line style from solid to dotted or dashed and to remove the border around a single image. As always any problems with making these changes please let me know. Good luck!

Friday, June 29, 2012

How to Remove Image Border in Default Blogger Templates Simple and Awesome Inc

In this Blogger tutorial I show you how to remove the border around images in Blogger posts (Blogspot posts) when using one of the latest default Blogger templates Simple or Awesome Inc.


Below I explore two methods of removing or deleting image borders in the Blogger template Simple. The first method shows you how to remove the image border using Template Designer and the second method outlined describes how to remove the image border manually by changing the code.


Method 1 - Use Template Designer to Remove Image Border in Blogger

  1. From the Blogger Dashboard go to Design > Template Designer

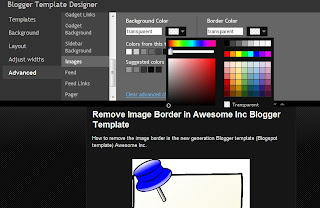
  2. Then select Advanced > Images

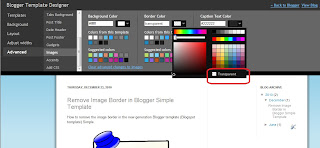
  3. Under Border Color use the drop down arrow to open the color palette

  4. Change the setting to transparent by checking the small box on the bottom right hand side marked "transparent"

    How to change the image border to transparent in Blogger
    Note: If you are using the black version of the Awesome Inc template you will need to change the Background Color to transparent too. Click on the down arrow of the color palette and select transparent.

    Remove border Awesome Inc Blogger template
  5. Click Apply to Blog to save your changes to the template

  6. Navigate to any post page to view images in posts without the border


Method 2 - Change Template Code to Manually Remove Image Border from the New Default Blogger Templates
  1. From the Blogger Dashboard go to Design > Edit HTML

  2. Back up your Blogger template

  3. Find this line amongst the declared variables at the top of your template

    <Variable name="image.border.color" description="Border Color" type="color" default="transparent" value="#cccccc"/>

  4. Change to the value of the border color to transparent like so

    <Variable name="image.border.color" description="Border Color" type="color" default="transparent" value="transparent"/>

  5. Save your changes to the template

  6. Navigate to any post page that has an image and see that the border around the image is no longer visible


In this Blogger tutorial (Blogspot tutorial) I have shown you how to remove or delete the border around images in Blogger posts for the newest generation of default Blogger templates Simple and Awesome Inc. I have discussed two different methods to remove the border around the images either by adjusting the settings in the Blogger Template Designer or by manually changing the code of the variable in the CSS styling section of the default Blogger template


How to Remove or Change the Blog Title Border in Blogger (Blogspot)

In this Blogger tutorial I discuss how to change the blog title border color or remove the border in a Blogger template (Blogspot template) by changing either the CSS styling of the border manually or by using the Blogger Template Designer feature.

Lots of bloggers have updated their Blogger template to the new default series of Blogger templates for 2010. There are however many of you who are still using the default Minima template from 2006 (and there are lots of good reasons to do so) so this tutorial is for you and anyone else who is using a custom Blogger template based on Minima.

Remove or Change the Blog Title Border in Blogger (Blogspot)
There are two simple ways to remove the border around the blog title in Blogger. We are going to hide the border rather than actually remove the code that creates it by making the border color transparent. I will also show you how to change the border color.

Method 1 discusses how to do this using the Blogger Template Designer while Method 2 describes how to change the blog title border manually by changing the code.


Method 1 - Using Blogger Template Designer
  1. Log in to Blogger
  2. From the Dashboard go to Design > Template Designer
  3. Go to Templates > Advanced > Border Color

  4. Choose the down arrow color picker to activate the color palette window
  5. Choose transparent which is below the color palette to remove the border around the blog title completely. You now will see the blog title border disappear. Or choose a new color from the color palette to change the color
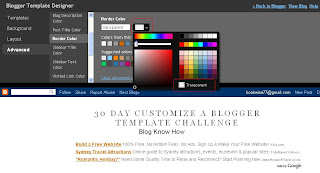
    Remove Blog Title Border in Blogger
    Remove Blog Title Border

    Change Blog Title Border Color in Blogger
    Change Blog Title Border Color
  6. Click on Apply to Blog to save your changes


Method 2
If the Blogger Template Designer is not working on your template for some reason you can tweak the code in your template to remove the border around the blog title

  1. Log in to Blogger
  2. From the Dashboard go to Design > Edit HTML
  3. Back up your Blogger template
  4. Find the border color variable which will be near the top of the template code

  5. Change the border color value to transparent to remove the border altogether so that your code now looks like this:

    type="color" default="#ccc" value="transparent">

    or change the value to a color of your choice eg

    type="color" default="#ccc" value="#ff7f00">
  6. Save your template and view your blog to see that the border around the blog title has been removed or changed color

    Remove Blog Title Border CSS Styling in Blogger


Tips and Troubleshooting
Below are some tips to help you further customize the blog title border width. You can either remove the inner border, thicken the outer border or thicken both borders around the blog title in Blogger.

  1. To change the width of the border around the blog title in Minima change the following:

    #header {
    margin: 5px;
    border: 1px solid $bordercolor;
    text-align: center;
    color:$pagetitlecolor;
    }

    to

    #header {
    margin: 5px;
    border: 10px solid $bordercolor;
    text-align: center;
    color:$pagetitlecolor;
    }

    This code increases the border width from 1px to 10px
  2. To remove the inner border around the blog title in Minima change the code to the following:

    #header {
    margin: 5px;
    border: 10px solid $bordercolor; (remove this line)
    text-align: center;
    color:$pagetitlecolor;
    }
  3. To increase the width of the outer border around the blog title in Minima change this code

    #header-wrapper {
    width:660px;
    margin:0 auto 10px;
    border:10px solid $bordercolor;
    }

In this Blogger tutorial you have learned two methods to change the color of the border around a blog title in Blogger blog (Blogspot blog). I have also shown you how to increase the size of the border width. This tutorial applies particularly to the default Blogger template Minima but also is relevant for any blogger using a custom Blogger template based on Minima. Good luck!


horizontal random post

    Random Posts...!!!