Showing posts with label Simple. Show all posts

Sunday, July 8, 2012

Add a Simple Drop Down Menu to Blogger

In today's Blogger tutorial I show you how to add a simple drop down menu widget sometimes called a select box to the sidebar of your Blogger blog (Blogspot blog). If you want to add lots of links to your Blogger blog but are worried about the amount of space this will take up on your blog this tutorial is for you. A drop down widget is a neat solution to the cluttered sidebar problem as it is both space saving and easy to install. The convenience of a drop down menu widget can be seen on many blogs where it is used for lists like a long Blogroll, Categories list, Labels list or a Recommended Posts list.

How to Add a Drop Down Menu Widget to Blogger
Adding a drop down menu to Blogger is well within the capabilities of even beginner bloggers. Most of the work is in cutting and pasting the links which is not difficult for anyone with basic computer skills. So let's get started but first here is a working drop down menu list with links to various posts in my blog:


  1. Log in to Blogger if not already logged in
  2. Navigate from the Dashboard to Layout > Page Elements.
  3. Click on Add a Gadget in the sidebar or other location if you wish
  4. Select a HTML/JavaScript gadget from the list of gadgets
  5. Paste the following code into the content box of the widget:

    <form><select name="menu" onchange="window.open(this.options[this.selectedIndex].value,'_blank')"
    size=1 name=menu>
    <option>- Your Menu Title -</option>

    <!-- Change the following links to your own -->

    <option value="http://URL of link1">Link 1</option>
    <option value="http://URL of link2">Link 2</option>
    <option value="http://URL of link3">Link 3</option>
    <option value="http://URL of link4">Link 4</option>
    <option value="http://URL of link5">Link 5</option><option value="http://free-seo-tricks.blogspot.com">SEO Blogger Tips and Tricks</option>
    </select></form>

  6. Replace _blank as follows:

    • To have a new window open leave the same

    • To have the new page appear in the same window replace _self
  7. Replace - Your Menu Title - with a title of your own
  8. For each instance of the option values highlighted in red substitute your own links and link names. For example:

    <option value="http://free-seo-tricks.blogspot.com">SEO Blogger Tips and Tricks</option>

  9. Click Save

  10. Use drag and drop to position the drop down menu widget in the location you want it within your sidebar and save any changes

  11. Click View Blog to admire the new drop down menu in the sidebar of your blog
In today's Blogger tutorial I have provided you with instructions to create and insert a simple drop down menu widget in the sidebar of your Blogger blog (Blogspot blog). This widget is ideal for reducing clutter on your Blogger sidebar and excellent for displaying long lists of links such as labels in a convenient, neat and space saving way. A drop down menu gadget is easily installed from the Layout > Page Elements page and can be customized to your own specifications. Any problems with this Blogger tweak please let me know. Enjoy!

Friday, June 29, 2012

How to Remove Image Border in Default Blogger Templates Simple and Awesome Inc

In this Blogger tutorial I show you how to remove the border around images in Blogger posts (Blogspot posts) when using one of the latest default Blogger templates Simple or Awesome Inc.


Below I explore two methods of removing or deleting image borders in the Blogger template Simple. The first method shows you how to remove the image border using Template Designer and the second method outlined describes how to remove the image border manually by changing the code.


Method 1 - Use Template Designer to Remove Image Border in Blogger

  1. From the Blogger Dashboard go to Design > Template Designer

  2. Then select Advanced > Images

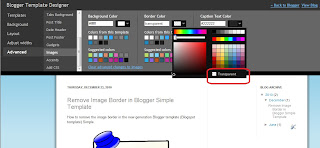
  3. Under Border Color use the drop down arrow to open the color palette

  4. Change the setting to transparent by checking the small box on the bottom right hand side marked "transparent"

    How to change the image border to transparent in Blogger
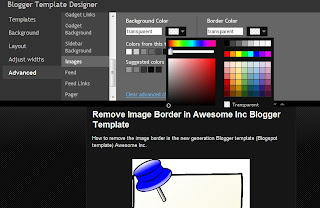
    Note: If you are using the black version of the Awesome Inc template you will need to change the Background Color to transparent too. Click on the down arrow of the color palette and select transparent.

    Remove border Awesome Inc Blogger template
  5. Click Apply to Blog to save your changes to the template

  6. Navigate to any post page to view images in posts without the border


Method 2 - Change Template Code to Manually Remove Image Border from the New Default Blogger Templates
  1. From the Blogger Dashboard go to Design > Edit HTML

  2. Back up your Blogger template

  3. Find this line amongst the declared variables at the top of your template

    <Variable name="image.border.color" description="Border Color" type="color" default="transparent" value="#cccccc"/>

  4. Change to the value of the border color to transparent like so

    <Variable name="image.border.color" description="Border Color" type="color" default="transparent" value="transparent"/>

  5. Save your changes to the template

  6. Navigate to any post page that has an image and see that the border around the image is no longer visible


In this Blogger tutorial (Blogspot tutorial) I have shown you how to remove or delete the border around images in Blogger posts for the newest generation of default Blogger templates Simple and Awesome Inc. I have discussed two different methods to remove the border around the images either by adjusting the settings in the Blogger Template Designer or by manually changing the code of the variable in the CSS styling section of the default Blogger template


horizontal random post

    Random Posts...!!!