Showing posts with label Style. Show all posts

Sunday, October 6, 2013

Advanced Mashable Style Following Widget For Blogger

Adding eye-catching social sharing widget to your blog/site increase your chances of getting more subscribers. Most visitors are force to click on subscription widget due to awesome sharing widget you present them, why some clicked it just for testing and before you know it, they become your loyal subscribers/followers.

Now i will be sharing with you, a spinning social sharing widget, which rotate on mouse hover according to the degree you set it, and return to it's original position when you remove the mover hover.

How To Add Spinning Social Icons

  • Go to you blogger dashboard
  • Click on Layout Add a Gadget 
  • Select HTML/JavaScript from the options listed and paste the following code in the content box.
 

    filexone.official/">    filexone/">    102254783119291933203">    Example/">    filexone/">


  • Replace Your Facebook Page URL Username GetFreo
  • Replace Your Twitter Username filexone
  • Replace Your +Google Profile Number 102254783119291933203
  • Replace Your feedburner Username Example
  • Replace Your Youtube Username filexone
  • Click on Save button
Customization
You can easily customize the icons to your own satisfaction by editing the code below.
  • To change the rate (time taken) at which the icon rotate, simple edit 0.8s
  • You can also change the degree at which the icon rotate,simply edit 360deg
If you need any further help, don't hesitate to ask using the comment box. Peace out pals :)

Wednesday, July 11, 2012

How to Change Bullet Point Style in Blogger (Blogspot) Lists

In Part 1 of this three part series of Blogger tutorials I discuss how to change bullet point styles of lists you may want to include in Blogger posts. This first Blogger tutorial deals with unordered lists and how these can be styled using CSS in Blogger (Blogspot). The second part of these tutorials will deal with ordered lists while part 3 discusses bullet point changes you can make to your sidebar, footer and menus.

Today you will learn how to:
  • change the style of bullet points in unordered lists
  • add bullet points to unordered lists if they are absent
  • add an image instead of a bullet to lists in your Blogger posts
This tutorial is rated easy and is designed so that even Blogger newbies can make the changes they want to their Blogger template. Changing the bullet point style involves changing the CSS styling in your Blogger template (Blogspot template). Join me as I walk you through this step by step guide. How to Add Bullet Points to a Blogger Post If you are still using the old Blogger editor you will need to add bullet points manually to any unordered lists you create in Blogger posts. If you are using the new editor the work is done for you. Either way though this is the type of code that generates unordered lists:
  • Create your own list markers in Blogger
  • Create unordered lists in Blogger
  • Create bullet points in Blogger
Any text can be placed between the two tags. Simply copy this list into a Blogger post and substitute your text for mine and you will have an unordered list. Circular Bullet Points Circular bullets (also known as markers or discs) are displayed in Blogger by default whenever unordered lists appear. This means that whenever the tags are used in Blogger posts a leader dot or disc will appear before each line of text denoted by
  • . (Note I will discuss ordered lists tags in part two of this tutorial).

    An unordered list in a Blogger post using the tags would appear like this:
    • Change Bullet Point Style in Blogger
    • Add Bullets to Blogger
    • Changing the look of unordered lists in Blogger
    We can make lots of changes to the look of these filled discs or filled circles by changing the CSS styling in Blogger. For instance we can have squares, or we can choose to have no bullet point at all. Here's how. To Add Square Bullet Points to Blogger (Blogspot) The following code will replace the filled circle bullet points with squares instead:
    1. Login to Blogger if not already logged in

    2. From the Dashboard go to Design >Edit HTML

    3. Back up your template

    4. Find the posts section of your CSS stylesheet which will be before ]]> tag

    5. For the following default Blogger templates eg "Simple" add the following CSS code to the post section like this

      .post ul li {
      list-style: square;
      }


    6. Save template and view blog post to see the circular bullet points have been replaced by square ones
    To Add Circle Bullet Points to Blogger (Blogspot) To add unfilled circle list markers or bullet points to Blogger posts do the following:
    1. Follow steps 1-4 as per square bullets

    2. Add the following code to the posts section of the CSS stylesheet of your Blogger template by entering the following code:

      .post ul li {
      list-style: circle;
      }


    3. Save the changes to your template and view a blog post to see the empty circle bullet points
    How To Indent Bullet Points in Blogger There are two ways to increase the indentation of list style markers or bullet points.
    1. Using the Inside or Outside Element
      The indentation of bullet points can be varied using the "inside" element. By default the list will be "outside" unless the "inside element" is used. The following code shifts the indentation of the list further to the right.

      .post ul li {
      list-style: circle inside;
      }


    2. Custom Indentation CSS Styling
      It is also possible to add custom indentation styling to lists. For instance here I have added a 2.5em indent using the following code to the circles example:

      .post ul li {
      list-style: circle;
      margin-left: 2.5em;
      }

    How To Replace Bullet Points with an Image in Blogger (Blogspot) Sometimes you may prefer to have an image list marker or icon instead of a bullet point. You will need to host your image somewhere such as a free image hosting service eg Flickr or Photo Bucket. Follow the steps below to replace bullet points in your Blogger posts with an image
    1. Follow steps 1-4 as per square bullets

    2. In the CSS styling of the posts section of your Blogger template and before the insert the following code:

      .post ul li {
      list-style: url("http://URLaddressofImage.gif");
      }


    3. Replace URLaddressofImage with the URL address of the image you have uploaded to an image hosting service. Note in most cases the file will have a .gif extension. If the extension is anything other than .gif you will need to change this too.


    4. Save the changes to your Blogger template and navigate to a post page to see your image list marker installed
    How to Remove the Bullet Points from Blogger Posts If you are going for a minimalist look you may prefer to have no bullet points in the lists in your Blogger posts. In this case:
    1. Follow steps 1-4 as per square bullets

    2. In the CSS styling of the posts section of your Blogger template and before the insert the following code:

      .post ul li {
      list-style: none;
      }

  • Tuesday, June 26, 2012

    Access Old Style Templates in Blogger (Blogspot)

    Can I still use the old default templates for my Blogger blog (Blogspot blog)?" is a frequent question I am asked on Blog Know How pretty often. Other people have asked me about the template I am using and how to get it. In answer to the first question as you can see older style templates do work on Blogger. And with respect to the second question the template I am using on Blog Know How is an enhanced version of the Rounders 3 Blogger template which is one of the older style default Blogger templates available from 2006 onwards.

    In today's Blogger tutorial I am going to show you how to access the older style default Blogger templates (Blogspot templates) and activate them on your Blogger blog. This tutorial is mostly written for those new to Blogger who might not realise that there are a number of default Blogger layouts released in 2006 that are still perfectly usuable. Also there may be some of you who would like to revert back to an older style Blogger template but are not sure how to find the old templates on Blogger.

    A Word of Warning First
    At the outset I need to say that by applying an older style Blogger template to an existing blog you may lose some of the advanced design and layout features in the Blogger Template Designer. This may not be a drawback if you are happy to do a bit of tweaking and may actually be a far better alternative than downloading a free custom Blogger template that may have a host of compatibility problems with Blogger especially if it was released a while ago. There are some pretty good free custom Blogger templates out there and there are some which were thrown together and have all sorts of problems which are not easily solvable unless you know how to code in CSS.

    So please be warned that you may potentially lose some features in converting to an older Blogger template. For instance if you are using the Simple default Blogger template and already have a three column layout selected with a 2 or 3 column footer then you will find that Blogger will revert to a two column layout and place all your widgets in the sidebar if you select an older style template. You will then need to manually add the footer and the extra sidebar.
    I suggest before you start that you download a full back up of your template and that you upload this to a test blog to see how it looks rather than trying it out on a live blog. However if you decide go ahead and later change your mind and want to revert back to the one of the newer Blogger templates you will need to manually shift your widgets out of the sidebar using the drag and drop feature in Page Elements
    How to Access Older Style Blogger (Blogspot) Templates

    Note: These instructions assume you are using the updated Blogger interface. If you are using the old Blogger interface (you will have a message at the top of your blog "Try the updated Blogger interface") then start at step 3.

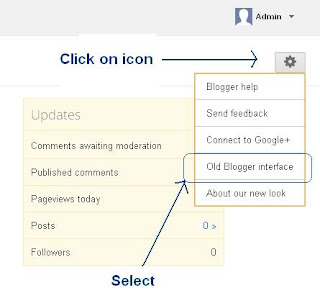
    1. From Overview in the updated Blogger interface click on the wheel icon at the top right which will give you an array of Blogger options

    2. Select the Older Blogger Interface from the drop down menu

      Select Old Blogger Interface from Drop Down Menu in Blogger overview

    3. The older style Blogger Dashboard will now be visible and displaying a list of blogs if you have more than one otherwise just the one. Click on Design from the list of links under the blog title you wish to apply the older Blogger template to.

      Select Design in the Old Blogger interface

    4. Click on the Edit HTML link located under the Blogger tabs menu

      Select Edit HTML in Blogger

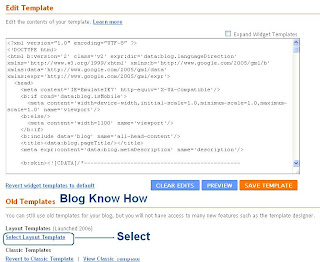
    5. Once on the Edit HTML page scroll to the bottom of the page and on the left you will see a heading entitled Old Templates. Click on the Select Layout Templates from the list. Avoid the Classic templates as these date from Blogger's first inception and are really too old to be of use.

      Select old template layout from Blogger edit HTML page

    6. You will now be on the older style Blogger templates page and can scroll through and select a template. Use the preview link to see how your blog looks with one of the older style templates applied. I use the Rounders 3 for Blog Know How by the way although I have adapted it to a 3 column layout.

      Select default Blogger template from the menu

    7. Once you are sure you want to change over to an older style template click on the save button to apply the older style default Blogger template to your Blogspot blog.

    8. Click on View Blog at the right of the menus tabs to view your changes and navigate around your blog.

    horizontal random post

      Random Posts...!!!