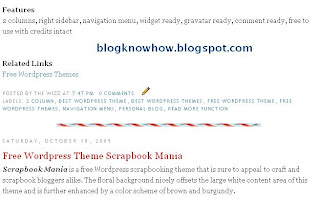
This tweak is very easy and well within the capabilities of any Blogspot blogger. Only a few simple changes to your Blogger template are required and these are in the CSS styling section.

By way of example I will use a divider that I downloaded from the internet free by searching for free divider graphics. Here are some sample dividers you can use to get started:

URL address:
https://blogger.googleusercontent.com/img/b/R29vZ2xl/AVvXsEjCIyxYJpVdiVXShLbbHEtxiTmoXmin9BhBYdjFan0KAkX01iLMP_4weKDgfGEC4fORAuGl6V_DFBmEj14O5fZZVjPg8Fgjr0HgiBsd6O5yXWbxLaGF1_8Ixiof1x_Sgsdjrbcsyv3RBeA/s400/ribbon.gif

URL address:
https://blogger.googleusercontent.com/img/b/R29vZ2xl/AVvXsEgb9B-bQWOyOGBrySeQ8ibLvP9KXvU1O_XY-O3WOl_fZZvQpbeqE4LfDzvPHyyLMowslQZmvpgbTbQ5beoDFQr6u3wDsHhbSzc7PedJFynCDdTvLOAdwT6hjHlXznZeGKNPPx6PS_bh-tE/s400/bar1.gif

URL address:
https://blogger.googleusercontent.com/img/b/R29vZ2xl/AVvXsEjHauQ-4efOmHP2muQdHASNuCksgNOmtCgrz-PGgrnokXtf3IQXzJMDqM1B_uvLHpGpVVv3WkXdN3Qny4m_a-StgVFm6mQIl7W6GebHcakcBFVC4KNil23eHcrHO8ufnSAp-g42bKizJcM/s400/barbsmpl.jpg

URL address:
https://blogger.googleusercontent.com/img/b/R29vZ2xl/AVvXsEiuvvpmUzmaiyJ2csb5iTq5KCsp3B8pTmrTsnZaTjuLvmwW67EOU5ZP3FAHlb6s0p5gqbyg_goDgJHjGCMK5lxEj1Qi9oM_O1buZGUvfOlOFZwYR_GyZ8iCo7r2wdZgavRgE3LXW8vuiLI/s400/bar47.gif
How to Add a Divider Between Posts in Blogger
- Login to Blogger if not already logged in
- From the Dashboard navigate to Layout > Edit HTML
- Back up your Blogger template as a precaution by downloading it to your computer
- Find the following line of code in your template:
.post {
You are likely to have something like this in your template already:
.post {
margin:.5em 0 1.5em;
border-bottom:1px dotted $bordercolor;
padding-bottom:1.5em;
}
- Paste the following lines of code to this block making sure you paste them before the closing curly bracket:
background: url(https://blogger.googleusercontent.com/img/b/R29vZ2xl/AVvXsEjCIyxYJpVdiVXShLbbHEtxiTmoXmin9BhBYdjFan0KAkX01iLMP_4weKDgfGEC4fORAuGl6V_DFBmEj14O5fZZVjPg8Fgjr0HgiBsd6O5yXWbxLaGF1_8Ixiof1x_Sgsdjrbcsyv3RBeA/s400/ribbon.gif);
background-repeat: no-repeat;
background-position: bottom center;
margin:.5em 0 1.5em;
padding-bottom:1.5em;
- If any lines are duplicated remove them.
- Remove any line beginning with: border-bottom: eg
border-bottom:1px dotted $bordercolor;
- You will now have a block of code which looks like this plus any extra lines from the existing code in this block:
.post {
background: url(https://blogger.googleusercontent.com/img/b/R29vZ2xl/AVvXsEjCIyxYJpVdiVXShLbbHEtxiTmoXmin9BhBYdjFan0KAkX01iLMP_4weKDgfGEC4fORAuGl6V_DFBmEj14O5fZZVjPg8Fgjr0HgiBsd6O5yXWbxLaGF1_8Ixiof1x_Sgsdjrbcsyv3RBeA/s400/ribbon.gif);
background-repeat: no-repeat;
background-position: bottom center;
margin:.5em 0 1.5em;
padding-bottom:1.5em;
}
- Click on Save Template to save your changes
- Click on View Blog to see your new post divider between posts
- To change the divider to one of the above replace the URL address of the image (in red) with the URL address of the new image you want to use.
- To use your own divider image download to your computer from the internet and then save the image to a photo image service like Photobucket. Replace the divider image URL address (in red) with the URL address of your new image
- To increase the padding around the divider change the following line of code:
padding-bottom:1.5em;
to
padding-bottom:2.5em;


 Posted in:
1 comments:
i think for better result...
background-repeat: no-repeat; <--> background-repeat: repeat-x;
saloom \m/
Post a Comment
Please feel free to comment on this topic.