Adding eye-catching social sharing widget to your blog/site increase your chances of getting more subscribers. Most visitors are force to click on subscription widget due to awesome sharing widget you present them, why some clicked it just for testing and before you know it, they become your loyal subscribers/followers. Now i will be sharing with you, a spinning social sharing widget, which rotate on mouse hover according to the degree you set it, and return to it's original position when you remove the mover hover.
How To Add Spinning Social Icons
Go to you blogger dashboard
Click on Layout > Add a Gadget
Select HTML/JavaScript from the options listed and paste the following code in the content box.
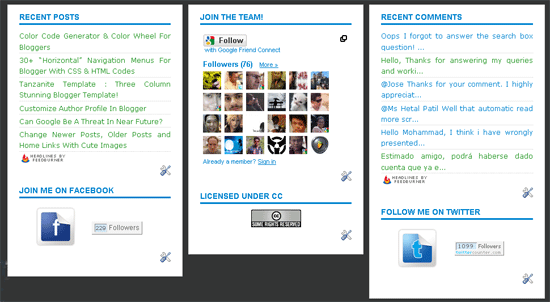
You might have seen a three column widget at the bottom section of many commercial and professional blogs. Where you can add whatever stuff you like. Take my footer widget as an example. I have added widgets that further keeps the reader busy. This Footer widget contains three columns where each column can accommodate as many widgets as you can add! In order to add such a widget to the bottom section of your blogs and also customize the look and feel of it then lets start learning today’s tutorial.
See a screenshot,
Add This Three Column Widget Inside Your Blogger Templates
.lowerbar .widget {margin: 0; padding: 10px 20px 0px 20px;}
.lowerbar h2 {
margin: 0px 0px 10px 0px;
padding: 3px 0px 3px 0px;
text-align: left;
color:#0084ce;
text-transform:uppercase;
font: bold 14px Arial, Tahoma, Verdana;
border-bottom:3px solid #0084ce;
}
.lowerbar ul {
margin: 0px 0px 0px 0px;
padding: 0px 0px 0px 0px;
list-style-type: none;
}
.lowerbar li {
margin: 0px 0px 2px 0px;
padding: 0px 0px 1px 0px;
border-bottom: 1px dotted #ccc;
* ----- LOWER SECTION ----- */
5. Now Search For
and just above this code paste the code below,
6. Save your template. done!
Now visit the page Layout > Page Elements and start adding widgets! :>>
Customization
You can easily customize the look and colours of the this footer widget. I have bolded the important parts in the CSS code above. Read the descriptions below carefully to better stylize your three column widget. For changing colours use our advanced Colour Code Generator
background:#333434; Changing the six digit colour code will change the background colour of this widget.
width: 960px; This is the width of the widget. If you want you can adjust this width value in accordance with the width of your blog.
background:#fff; and width: 32%; is the background colour and width of the three columns where the widgets are added.
color:#0084ce; This is the Colour of Title Headings
font: bold 14px Arial, Tahoma, Verdana;Edit this to change the font size and family.
border-bottom:3px solid #0084ce;Edit this to change the thickness, style and colour of the border that appears at the bottom of Title Heading
border-bottom: 1px dotted #ccc;Editing this will change the size, style and colour of the border that appears below links.
If you use Twitter then you are going to want to let your Blogger readers know about it. One effective way to show your Twitter updates on Blogger is to add a Twitter profile widget to the sidebar of your blog.
This widget is quite a bit more fancy than the current Twitter Updates Widget available through Blogger
On the minus side the widget may slow your blog down so test it out first if fast loading time is crucial to you.
How to Insert a Twitter Profile Widget into Blogger
Choose Profile Widget and you will be taken to a default profile widget page where you can customize your Twitter widget according to your needs.
Choose Settings and make sure that your username is correct
Choose Appearance and make any custom color changes you need to so that the widget will blend into your blog. At the very least you will need to change the shell background and the links colors to suit your blog
Choose Dimensions and change the sizing of the widget if it is too large to fit into your Blogger sidebar. The default setting is 250x300
Click on Test Your Settings to ensure your new widget looks the way you want it to
Click the Finish and Grab Code button
Copy the code by right click the mouse in the code box and choosing Select All. Right click again and choose Copy
Sign in to Blogger. From the Dashboard go to Layout | Page Elements
In the sidebar choose Add a Gadget and then a HTML/Javascript widget
Paste the Twitter code into the gadget content box and click Save
Your Twitter Profile Widget will now be showing in your Blogger sidebar so click on View Blog to admire it
In this Blogger tutorial I have showed you how to add a Twitter Profile Widget to the sidebar of your Blogger blog (Blogspot blog). This Twitter widget will encourage your blog readers to visit your Twitter Profile and with luck you may get some new Twitter followers out of it.
In today's Blogger tutorial I show you how to add a simple drop down menu widget sometimes called a select box to the sidebar of your Blogger blog (Blogspot blog). If you want to add lots of links to your Blogger blog but are worried about the amount of space this will take up on your blog this tutorial is for you. A drop down widget is a neat solution to the cluttered sidebar problem as it is both space saving and easy to install. The convenience of a drop down menu widget can be seen on many blogs where it is used for lists like a long Blogroll, Categories list, Labels list or a Recommended Posts list.
How to Add a Drop Down Menu Widget to Blogger
Adding a drop down menu to Blogger is well within the capabilities of even beginner bloggers. Most of the work is in cutting and pasting the links which is not difficult for anyone with basic computer skills. So let's get started but first here is a working drop down menu list with links to various posts in my blog:
Log in to Blogger if not already logged in
Navigate from the Dashboard to Layout > Page Elements.
Click on Add a Gadget in the sidebar or other location if you wish
Select a HTML/JavaScript gadget from the list of gadgets
Paste the following code into the content box of the widget:
<form><select name="menu" onchange="window.open(this.options[this.selectedIndex].value,'_blank')"
size=1 name=menu>
<option>- Your Menu Title -</option>
<!-- Change the following links to your own -->
<option value="http://URL of link1">Link 1</option>
<option value="http://URL of link2">Link 2</option>
<option value="http://URL of link3">Link 3</option>
<option value="http://URL of link4">Link 4</option>
<option value="http://URL of link5">Link 5</option><option value="http://free-seo-tricks.blogspot.com">SEO Blogger Tips and Tricks</option>
</select></form>
Replace _blank as follows:
To have a new window open leave the same
To have the new page appear in the same window replace _self
Replace - Your Menu Title - with a title of your own
For each instance of the option values highlighted in red substitute your own links and link names. For example:
<option value="http://free-seo-tricks.blogspot.com">SEO Blogger Tips and Tricks</option>
Click Save
Use drag and drop to position the drop down menu widget in the location you want it within your sidebar and save any changes
Click View Blog to admire the new drop down menu in the sidebar of your blog
In today's Blogger tutorial I have provided you with instructions to create and insert a simple drop down menu widget in the sidebar of your Blogger blog (Blogspot blog). This widget is ideal for reducing clutter on your Blogger sidebar and excellent for displaying long lists of links such as labels in a convenient, neat and space saving way. A drop down menu gadget is easily installed from the Layout > Page Elements page and can be customized to your own specifications. Any problems with this Blogger tweak please let me know. Enjoy!
If you are a regular Twitter user and have a bunch of followers you might want to add a Twitter Updates widget to Blogger (Blogspot). In today's tutorial I will show you the easy way to add a Twitter Updates widget to Blogger (Blogspot). It is fairly straightforward to add this Twitter Updates widget to Blogger so please don't be put off if you are a Blogger beginner as you can have this widget up and running in no time.
How to Add a Twitter Updates Gadget to Blogger
There are several methods of adding a Twitter Updates widget to Blogger which I will be discussing over the next few posts. Today I will start with the easiest method by far. This Twitter widget won't slow down your blog loading time particularly but I suggest as with all HTML widgets that you place it near the bottom of your column of gadgets and limit the number of updates shown.
This Twitter Updates widget will provide a basic widget only and is fine if you aren't too bothered about styling. The widget uses the styling from your blog based on the Blogger template you are using but unfortunately there is no way to modify its appearance at the moment. If you want something a little more fancy keep an eye out for my future posts about Twitter Updates widgets.
Log in to Blogger if you are not already logged in
Go to Layout > Page Elements
Click Add a Gadget in the Blogger sidebar
Click on More Gadgets to the left and choose the Twitter Updates widget. Blogger may change this so if you don't find it there try looking in Featured or Popular.
Enter your Twitter name (usually your blog name)
Choose the number of updates to display. By default this is set to 5
Uncheck display link to your Twitter page if you do not want visitors to go to your Twitter page for some reason otherwise leave it as is.
Click Update to Preview any changes and then Save
Use Blogger's drag and drop feature to reposition your Twitter gadget in the desired location in sidebar or footer of your Blogger blog. Save any changes
Click View Blog to admire your new Twitter Updates widget
In today's tutorial I have shown you how easy it is to add a Twitter Updates widget to your Blogger blog (Blogspot blog). The Twitter Updates widget will display your latest Twitter tweets on your blog. The disadvantage of this third party Twitter Updates widget is that it has basic styling only and no way to modify it. On the plus side it loads fast and is likely to be trouble free. I will be writing more about Twitter updates widgets in the next couple of posts so keep an eye out. Enjoy!
Adding the most popular posts widget in blogger is as easy as drinking a cup of tea. This widget lets you show the most popular and viewed posts on your blog. You can display as many posts as you want. You can choose whether you want to display posts with or without thumbnail and snippet.
You can also choose time period for your posts to display from. Add this easy widget and in your sidebar and turn your visitors into readers.


 Adding eye-catching social sharing widget to your blog/site increase your chances of getting more subscribers. Most visitors are force to click on subscription widget due to awesome sharing widget you present them, why some clicked it just for testing and before you know it, they become your loyal subscribers/followers.
filexone/">
102254783119291933203">
Example/">
filexone/">