Showing posts with label blogger tutorials. Show all posts

Sunday, September 16, 2012

Add Facebook Send and Like Button To Posts In Blogger

Facebook send and likeI am going to show you an easier way to like and send / share your posts with just one click. User will be more attracted to like your posts while reading or after reading article. If readers loved your post much, they will even send it to their friends on facebook. Facebook has combined the like and send button into a single plugin. This widget will took less time and less space but will work greater for you.


Add Facebook Like and Send Button To Blogger Posts

1. Go to Blogger Dashboard > Your Blog > Template > Edit HTML
2. Backup your template.
3. Check the box of expand widget template.
4. Search for <data:post.body/>.
5. Now if you want to add the plugin at the end of posts, then add the following code below <data:post.body/>. If you want to add the plugin just below post titles, then add the below code before <data:post.body/>.
<div id="fb-root"></div><script src="http://connect.facebook.net/en_US/all.js#xfbml=1"></script><fb:like href="" send="true" layout="button_count" width="450" show_faces="false" font=""></fb:like>
6. Now save your template and you're done !
Enhanced by Zemanta

Friday, September 14, 2012

Google Code Hosting for Free

Google Code Hosting for FreeHosting on Google Code is for every professional and beginner blogger/webmaster ho needs a suitable hosting to upload his/her Java scripts, Images, Documents etc. So Google has launched a free and amazing service which allows you to upload/host your files for free.
I've uploaded many files and is working perfectly. The amazing thing is that the Google code provides 4GB free storage with 200MB file limit. You can whether let the user to view the file, host the file or download the file. You can upload any file e.g Java Script, Image, Video, CSS/Style, Documents etc with no restriction and the method is quite easy and short. So be a true and pro Blogger and use Hosting on Google Code!

Start Hosting Files on Google Code for Free

1. Go to Google Code Hosting and fill the required fields. Choose License as MIT License and Version Control System as Mercurial and press Create Project.


Google Code Hosting for Free

2. Now click Download and then click New Download.

Google Code Hosting for Free

3. Now Choose Any File e.g javascript file, write Summary, Description and press Submit file.
4. You will be taken to a new page, then click your uploaded file's Title.


5. Now again you will be taken to a new page. Then right click at your uploaded file's title and copy the file's link. Now that link will be your uploaded file's download/source link.

Google Code Hosting is Free and Easy to use !

Wednesday, July 4, 2012

How to Add Borders to a Blogger Footer Blogspot

In this Blogger tutorial I going to show you how to add border styling to the new footer. You will learn how to add a border around all of your footer columns or around only part of the footer columns. You will also learn how to add different border styles and border colors to customize your 3-4 column footer.

This is a walkthrough designed to assist bloggers with no experience of CSS styling who want to enhance their Blogger template with borders and other CSS styling. By following these examples you will gain the knowledge you need to make many types of custom changes to the borders of your new Blogger footer.

How to Add Borders to the Footer of a Blogger Template
To add lines (commonly known as borders) to a Blogger template footer we need to add some CSS styling.

Before beginning to add borders there are 3 values to consider:

  • width of the border (line thickness eg 1px, 2px, 3px and so on)
  • line style of the border (solid, dotted, dashed, double)
  • color of the border (hex color)
  1. How to Add a Border Around the Outside of a Blogger Footer
    First we add the border property and then add the border style, border width and the border color values. In these following examples just by changing these values we can achieve lots of different results.

    • To Add a Dashed Border Around the Outside of a Blogger Footer
      With the following code a dashed black line 1px thick will be added around the outside of the footer.

      #footer-columns {

      margin:0 auto;
      clear:both;
      }

      Change to:

      #footer-columns {
      border: 1px dashed #000000;
      clear:both;
      margin:0 auto;
      }


    • To Add a Dotted Border Around the Outside of a Blogger Footer
      By changing the dashed black line to a dotted border it is simple to get a different line style.

      #footer-columns {
      clear:both;
      margin:0 auto;
      }

      Change to:

      #footer-columns {
      border: 1px dotted #000000;
      clear:both;
      margin:0 auto;
      }


    • To Add a Solid Border (Blue 3px thick) Around the Outside of a Blogger Footer
      To add extra emphasis we can change the line color and its thickness. Here I have made the line blue rather than black and thickened it from 1px to 3px.

      #footer-columns {
      clear:both;
      margin:0 auto;
      }

      Change to:

      #footer-columns {
      border: 3px solid #336699;
      clear:both;
      margin:0 auto;
      }

  2. To Add a Partial Border to a Blogger Footer
    Sometimes we might want to add a border to only one part of the footer area rather than the whole thing. Again we add the border property but we append it with the following values: (top, bottom, left, right) depending on where we want to place the border.

    • To Add a Solid Border to the Top of a Blogger Footer
      #footer-columns {
      clear:both;
      margin:0 auto;
      }

      Change to:

      #footer-columns {
      border-top: 1px solid #000000;
      clear:both;
      margin:0 auto;
      }


    • To Add a Solid Border to the Bottom of a Blogger Footer
      #footer-columns {
      clear:both;
      margin:0 auto;
      }

      Change to:

      #footer-columns {
      border-bottom: 1px solid #000000;
      clear:both;
      margin:0 auto;
      }

    • To Add a Dashed Border to the Top of a Blogger Footer
      #footer-columns {
      clear:both;
      margin:0 auto;
      }

      Change to:

      #footer-columns {
      border-top: 1px dashed #000000;
      clear:both;
      margin:0 auto;
      }

    • To Add a Dotted Border to Both Top and Bottom of a Blogger Footer
      #footer-columns {
      clear:both;
      margin:0 auto;
      }

      Change to:

      #footer-columns {
      border-top: 1px dotted #000000;
      border-bottom: 1px dotted #000000;

      clear:both;
      margin:0 auto;
      }

    • To Add a Dotted Border 4px thick to Both Top and Bottom of a Blogger Footer
      #footer-columns {
      clear:both;
      margin:0 auto;
      }

      Change to:

      #footer-columns {
      border-top: 4px dotted #000000;
      border-bottom: 4px dotted #000000;

      clear:both;
      margin:0 auto;
      }


    • To Add a Blue Solid Border 5px thick to Both Top and Bottom of a Blogger Footer
      #footer-columns {
      clear:both;
      margin:0 auto;
      }

      Change to:

      #footer-columns {
      border-top: 5px solid #336699;
      border-bottom: 5px solid #336699;

      clear:both;
      margin:0 auto;
      }

In this Blogger tutorial (Blogspot tutorial) I have shown you how to make some simple customizations to the borders of a Blogger footer. This tutorial is intended as an extension of my earlier tutorial on adding a three or four column footer to Blogger. However it is also suitable if you are using a custom template and want to enhance the footer styling further.
You have learned how to add borders to a Blogger footer and change the position, color, width and styling. If you want to know more about CSS styling I will be publishing further articles in the future. 

Friday, June 29, 2012

Add CSS Styling to Blockquotes in a Blogger Template

Today I continue the series of Blogger tutorials (Blogspot tutorials) by showing you how to apply CSS styling to blockquotes in a Blogger template.

Today's tutorial on Blogger blockquotes will be useful if you are using a default Blogger template or a third party custom template. It will show you how to change your blockquote area in the following ways:

  • Add a background color to the blockquote
  • Add a border around the background of the blockquote
  • Add or change the color of the blockquote text
  • Add or change padding around the text
  • Add or change the margin
  • Add a background image

Blogger beginners you can relax as I have written this Blogger tutorial with you in mind. I will walk you through the steps of styling the blockquote section and you will see that it is not as daunting as it first appears. This Blogger tutorial assumes no knowledge of CSS styling. I have rated the difficulty level as easy to medium because it does involve making adjustments to your Blogger template.

How to Change the Blockquote Section of a Blogger Template

First of all let's take a look at the CSS Styling for the blockquote section of a default Minima Blogger template.

.post-body blockquote {
line-height:1.3em;
}

.post blockquote {
margin:1em 20px;
}

.post blockquote p {
margin:.75em 0;
}

As you can see the blockquotes area of this Minima template has minimal styling. Apart from line height and margin indentation there has been no additional code added to improve the look of the template.
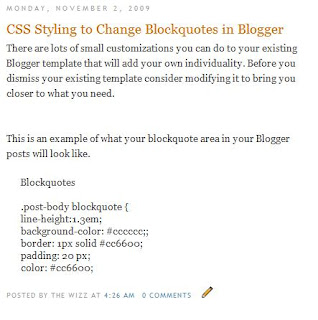
Minima Blockquotes No Extra CSS Styling
Let's go ahead and give the blockquotes in your Blogger posts some styling. I will use the Minima template to show you but you can do the same for another default template or custom template. As always back up your Blogger template by downloading it to your computer before you begin to make any changes.

  1. CSS Styling to Add a Background Color to Blockquotes
    Adding a background color to the blockquote area can be achieved in 1 of 2 ways.

    1. One way is to enter the hex color directly into the styling as I have done below. This code will add a light grey background to the blockquote area.

      .post-body blockquote {
      line-height:1.3em;
      background-color: #cccccc;
      }
    2. Another way to add a background color using CSS styling for the blockquote area is to make use of the variable names already set up. The border color is light grey #cccccc by default in a Minima template. The advantage of this option is that if you decide to change the border color under Layout > Fonts and Colors the blockquote color will automatically change to the new color too.

      .post-body blockquote {
      line-height:1.3em;
      background-color: $bordercolor;
      }

      If you wanted the background color to be the same as the blog title color rather than the border color you would write this instead

      .post-body blockquote {
      line-height:1.3em;
      background-color: $titlecolor;
      }
  2. CSS Styling to Add a Border Around Blockquotes
    You have your background in place now let's add a narrow border around the background to add some more definition. The following will add a 1px solid border around the outside of your blockquote area in your Blogger posts.

    .post-body blockquote {
    line-height:1.3em;
    background-color: #cccccc;
    border: 1px solid #cc6600;
    }

    or if using variables

    .post-body blockquote {
    line-height:1.3em;
    background-color: $bordercolor;
    border: 1px solid $titlecolor;
    }
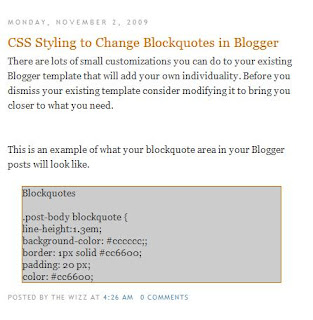
    Blockquotes With a Background and Background Border
  3. CSS Styling to Add Padding Around Blockquotes
    Now if we were to leave the styling at this point one of the problems would be that the text would butt up against the background which is not a good look. To create some space between the text and the background edge all the way around we use CSS styling to add some padding like this:

    .post-body blockquote {
    line-height:1.3em;
    background-color: #cccccc;
    border: 1px solid #cc6600;
    padding: 20 px;
    }

    or if using variables

    .post-body blockquote {
    line-height:1.3em;
    background-color: $bordercolor;
    border: 1px solid $titlecolor;
    padding: 20 px;
    }
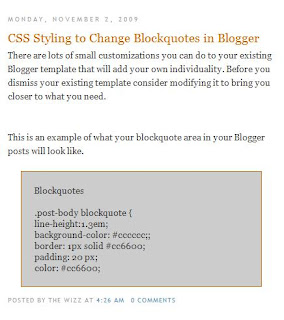
    Blockquotes With a Background, Background Border and Padding
  4. CSS Styling to Add or Change the Text Color of Blockquotes
    If you want to accent your blockquote area in your posts one effective way to do this is to make the blockquote text color a different color from the text color of your pages. We do this by picking a color and adding the following line to the code:

    .post-body blockquote {
    line-height:1.3em;
    background-color: #cccccc;
    border: 1px solid #cc6600;
    padding: 20 px;
    color: #cc6600
    }

    or if using variables

    .post-body blockquote {
    line-height:1.3em;
    background-color: $bordercolor;
    border: 1px solid $titlecolor;
    padding: 20 px;
    color: $titlecolor;
    }
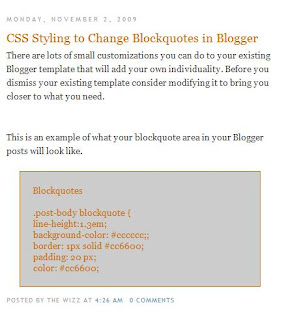
    Blockquotes With a Background, Background Border, Padding and Change of Text Color

Tips and Troubleshooting
If you want to add further modifications to the blockquotes area of your Blogger template here are several other possibilities.

  1. CSS Styling To Change the Margin of Blockquotes
    You can increase the margin from 1em to 1.5em by changing the margin line to
    margin: 1.5em 20px;
  2. CSS Styling to Add a Background Image to Blockquotes
    You can have your own image as a background in your blockquotes area of your posts by adding this line:

    background: url(http://URL of your image.jpg);

In today's Blogger tutorial (Blogspot tutorial) you have learned how to add CSS styling to the blockquotes area of your Blogger posts.
 I have shown you how to add a background, a background border, change the text color, add padding, change the margin and add a background image to the blockquotes code block.
 If you have a moment please let me know how you got on customizing your own Blogger template.


horizontal random post

    Random Posts...!!!