Showing posts with label blogger. Show all posts

Wednesday, October 16, 2013

How To Automatically Redirect A Blogger Blog To Another URL


Blogger Redirect Code
There are a number of reasons you may want to automatically send visitors to your blog to another URL or from one blog to another.For example if you moved your blog, if you had two blogs and wanted to focus one just one and cover both topics.Automatically directing visitors to another URL is actually quiet easy and only requires a snippet of code added to the top of the template.In this post i will show you the code needed to automatically Redirect from a Blogger Blog to any other URL.

Firstly i should mention some people don't like to be redirected and you should only direct to a site with similar content.If you redirect people to sales pages, sites with adult content or anywhere the user is uncomfortable with it will put your Blogger account in jeopardy.For this reason the code i have in this post can be set to Redirect in an amount of time set by you.So you can set the code to redirect after 5 seconds and place a message at the top of the blog telling visitors they will be redirected.

With that in mind i have created a test blog that will direct to Google.Com so you can see how it works.Follow the link and wait 5 seconds for the redirect.

Demo - BestTrix

Add Auto Redirect Code To Blogger

Step 1. In Your (New Design) Blogger Dashboard Click The Drop Down Menu For Your Blog > Choose Template > Then Edit Html > Now Proceed > Tick The Expand Widget Templates Box as shown in the video Below.
Step 2. Find the following piece of code in your blogs Html : 
(It's Near The Very Top)


Step 3. Copy And Paste The Following Code Directly Below / Under


Important - 

1. Replace http://www.learnfre.blogspot.com/ In Blue With The URL You Want To Forward To.

2. The Number 5 In Red Sets The Amount Of Seconds Before The User Is Redirected Change This To Suit.

Step 4. Save your template and your blog will now redirect after the time you set.Once again remember don't use this to send people to sites unrelated or with spam as your entire Blogger Account may be effected.

Add Your Comments, Views And Questions Below. :)

Tuesday, October 8, 2013

How To Replace "Post A Comment" Message In Blogger With Image Or Text

You can replace post a comment message that appears at your blogger comment box header section with image, text or even both. Most bloggers replace it with comment policy, so as to notify commenter with the rules and regulations guiding comments in their blog. I have some cool image which you can use to replace the post a comment message at your comment box header section.


See the example of what we are talking about in the image below.


How To Change Post A Comment Message

  • Go to your blogger dashboard
  • Click on "Template" > "Edit HTML" > "Proceed"
  • Mark/Tick "Expand Widget Template" (Remember to back up your template)
  • Use ctrl F to find the code below.


Now replace the code highlighted code above with any of the image code below.

Image Style 01

Image Code

Comment here


Image Style 02


Image Code

Comment here


Image Style 03

Image Code

Comment here

Image Style 04


Image Code

Comment here

Image Style 05


Image Code

Comment here
  • Now click Save Template and you are done.

How To Add Text To Comment Box Header Section

  • Go to "Settings" > "Posts and Comments" > click on Add below "Comment Form Message"
  • Write your text in the box provided and click on Save arrangement.
That's all!
Take few seconds to share this post with friends/followers and take good care of yourself and your love one's.

Sunday, October 6, 2013

Advanced Mashable Style Following Widget For Blogger

Adding eye-catching social sharing widget to your blog/site increase your chances of getting more subscribers. Most visitors are force to click on subscription widget due to awesome sharing widget you present them, why some clicked it just for testing and before you know it, they become your loyal subscribers/followers.

Now i will be sharing with you, a spinning social sharing widget, which rotate on mouse hover according to the degree you set it, and return to it's original position when you remove the mover hover.

How To Add Spinning Social Icons

  • Go to you blogger dashboard
  • Click on Layout > Add a Gadget 
  • Select HTML/JavaScript from the options listed and paste the following code in the content box.
 

    filexone.official/">    filexone/">    102254783119291933203">    Example/">    filexone/">


  • Replace Your Facebook Page URL Username GetFreo
  • Replace Your Twitter Username filexone
  • Replace Your +Google Profile Number 102254783119291933203
  • Replace Your feedburner Username Example
  • Replace Your Youtube Username filexone
  • Click on Save button
Customization
You can easily customize the icons to your own satisfaction by editing the code below.
  • To change the rate (time taken) at which the icon rotate, simple edit 0.8s
  • You can also change the degree at which the icon rotate,simply edit 360deg
If you need any further help, don't hesitate to ask using the comment box. Peace out pals :)

Friday, October 4, 2013

Add Meta Tags to Blogger for Better SEO


Add Meta Tags to Blogger for Better SEOToday i going to share Meta Tags For Blogger For SEO. This is my first post on SEO.
Meta tags have prime importance in indexing your site/blog to search engines. Blogger provides statics pages that are not good for SEO. To get more traffic we have to make pages Search Engines friendly.

Your website/blog can never be successful if your website links are not showing in Search Engines. Meta tags are HTML based. They reflect the Description, keywords and other terms to Search engines. It is important for bloggers to add meta tags for better performance.


Adding Meta Tags In Blogger:

  • Go To Blogger.com >> Your Blog >> Template
  • Now Backup your template.
  • Then select Edit HTML >> Proceed
  • Search for  and just after it paste the following code


<data:blog.pageName/> | <data:blog.title/>

<data:blog.pageTitle/>


Thursday, October 3, 2013

Add CSS Search Box to Blogger

Search Box in any Site or Blog has very important role it not only help the visitor but also help to increase  traffic.many People use this widget tool to find their desire content on that blog.so today i am going to share three Professional Search Box Code with you one by one.use my below some simple steps ...
  • Login to Blogger  >> Click on drop down >> Now select "Layout"
  • Now you will see "Add a Gadget" button click any of them
  • A new window will open .Scroll some down until you see " HTML/JavaScript" Button.
  • Click on " HTML/JavaScript" Button ,leave the Title blank and Put the below code in Content and then after click on save button.

Widget Code For Search Box

Widget Code For Dark Search Box


Widget Code For White Search Box


Widget Code For Dark With White Hover Effect Search Box


Tuesday, October 1, 2013

How To Change "Post a Comment" Text of Blogger Blog

You can see "Post a Comment" text above your comment form in blogger.If you like to replace this "Post a Comment" text with your own creative text follow the steps below.

1. Login to your blogger dashboard--> layout- -> Edit HTML

2. Click on "Expand Widget Templates".

3. Scroll down to where you see this:

Post a Comment


Note: You can find above code in 2 places.

4. Now replace above codes with your own text. For example I replace it with "Give Your's Feedbacks".

Change Post a Comment Text

5. Now save your template and you are done.

Refresh your site to see result.It will look like above image.

Keep Visiting LearnFre for More Tutorials. :)

Monday, September 30, 2013

Cool Stylish CSS Labels For Blogger

Friends, This is a widget to modify your label to a brick style with CSS effects. It is very effective widget to attract people when they are entering your blog. Now i share, How to install this widget into your blogger?. If you want to install please follow this post and enjoy……

How To Add stylish css Bricks Style Labels To Blogger from (masterhacksindia.blogspot.com)
Log in to Blogger account
  • Select Templates


  • Click on Edit HTML 

  • Tick On  Expand Widget Templates.

  • Find (Ctrl + F)   ]]>


  • Copy  the code shown below and paste Before/Above it.


/*-----Custom Labels Cloud widget by www.masterhacksindia.blogspot.com----*/
.label-size{
margin:0 2px 6px 0;
padding: 3px;
text-transform: uppercase;
border: solid 1px #C6C6C6;
border-radius: 3px;
float:left;
text-decoration:none;font-size:10px;color:#666;}
.label-size:hover {
border:1px solid #6BB5FF;
text-decoration: none;-moz-transition: all 0.5s ease-out;
-o-transition: all 0.5s ease-out;
-webkit-transition: all 0.5s ease-out;
-ms-transition: all 0.5s ease-out;
transition: all 0.5s ease-out;
-moz-transform: rotate(7deg);
-o-transform: rotate(7deg);
-webkit-transform: rotate(7deg);
-ms-transform: rotate(7deg);
transform: rotate(7deg);
filter: progid:DXImageTransform.Microsoft.Matrix(
M11=0.9961946980917455, M12=-0.08715574274765817, M21=0.08715574274765817, M22=0.9961946980917455, sizingMethod='auto expand');
zoom: 1;
}
.label-size a {
text-transform: uppercase;
float:left;
text-decoration: none;
}.label-size a:hover {
text-decoration: none;
}

  • Save Templates.

  • Then go to Layout


  • Now Click On Add Gadget Button.

  • Add Labels Gadget  from given list

  • Unchecked Show Number Of Post Per Label.

How To Add css Bricks Style Labels To Blogger from (masterhacksindia.blogspot.com)

  • Save it.

Friday, September 27, 2013

4 amazing New Improvements to Blogger Template HTML Editor

Google Blogger has just updated the Blogger Template HTML editor, and added four new features to make your experience even better! Now, whether you're a casual blogger, or a geek who likes tweaking his blog's template every now and then, this is place you now want to be! Check out these latest features now!


The Blogger Template HTML editor lets you edit your website's source code, and tweak it to your liking. If you know HTML, CSS and/or JavaScript, you can fully customize it to your preference. The sky is really the limit if you know what you're doing.
To get to this HTML editor, go to your Blogger dashboard, and open the blog you want to customize the template. From the Blog dashboard, click on the Template option from the left sidebar, and then find the Edit HTML button.
Edit Template HTML

What's new with the Template editor?

The new features are centered more towards user-friendliness (or rather, programmer-friendliness) and aim at boosting productivity. Previously, the Template HTML editor was much like the shapeless, bland HTML editor you get with Blogger posts (not that I'm complaining, it's a good way to keep things fast and simple).

But editing posts is one thing, and editing a template is quite another. One often had to download the code (I know I had to), make changes to it in a more comfortable editor (such as Notepad++), and then upload it again, just for the sake of keeping track of things more easily. Now I am no expert, but testing out your website or blog this way is one hell of a job. And unless you wanted to spend the whole day just making your posts look more presentable, you needed a better solution.....

.....which, by the way, has finally arrived! Blogger has made the template HTML editor much more comfortable to use by adding the following features.
  • Line numbering - Now, you can see line numbers on each line, making it much much more easier to spot errors and keep track of your code.
  • Syntax highlighting - Much like in advanced code editors, you can now see syntax highlighting. The editor will actually color code different objects in your source to make it much more readable.
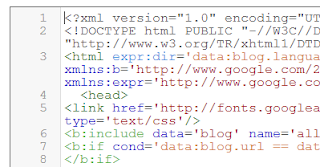
line numbering and syntax highlighting
  • Auto-indentation - I love code editors that auto-indent code for me so that I won't have to press all those extra Tabs and Spacebars. But more than that, this feature helps you keep your code organized, and you can easily keep track of what belongs where. For example, you can easily figure out what's inside your div tag, or what have you included in a list etc. You can see auto-indentation coming into action while you're writing some code. Blogger template editor will automatically put in the spaces for you. You can also use the Format Template option to clean up the indentation of your entire template.
  • Code folding - I love this option too. Once I'm done with a particular piece of code, such as a div tag, I can simply fold the code, and not have to look at that large chunk of code again. You can see this from the image below. If you follow to where the arrow is pointing, you will see a small, grey arrow (?) next to line number 13. And if you look at the line number below, you will see 582, which means that the editor just saved me from having to scroll down through 569 lines of code!
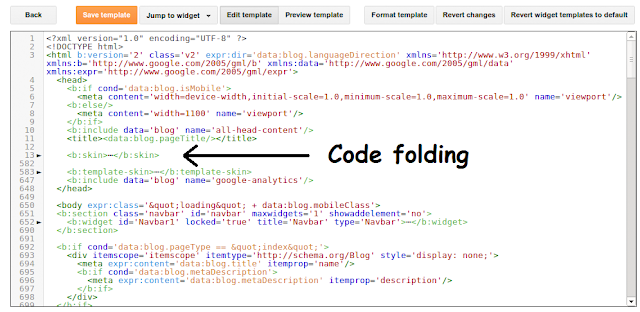
Code folding and auto-indentation
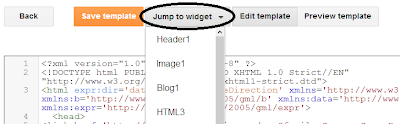
  • Jump to widget - Now, you have a quicker way of jumping to particular section of code in your template - code that belongs to a widget. Just click on the Jump To Widget button at the top of the editor, and you can see a list of all widgets you can jump to. Clicking on any will take you to the respective section in code.
Jump to widget
Like these new features? Tell us what you think about them in the comments section below. And as always, feel free to ask questions. Peace :)

Wednesday, September 25, 2013

Remove Navbar From Blogger

What is Blogger Navbar and Why Remove It?

Blogger has got various features of which one is a default Navigation Bar. It is a tiny strip on the top of your blog in which there are many buttons and a search field. Most of the bloggers hate the navbar. When you are blogging, Navbar can be useful thing, but sometimes,
you find it annoying and you really want to get rid of it. The main disadvantage of this bar is visual. If you have got a customized design, Navbar usually doesn't fit in. The two main reasons to remove the Navbar are:

1. Your Blog appears more professional 
2. It provides you with more space at the top for graphics

How to Remove It?

Most people who host their blogs on Blogger whine about the inability to remove the blogger navigation bar via their elements page. Well, now if you still want to use blogger’s template and remove the blogger navbar then just follow the simple trick.

1. Login into your blogger blog. 
2. Go to template and click on Edit Html 
3. Now search  and paste the following code just after it.

#navbar-iframe { display: none !important; }

4. Save your blogger template and you have managed it.
  
Hopefully you will like this article same as our previous posts. We always give respect to our reputable readers by providing the latest and informative knowledge. Again if you need any assistance or tips feel free to contact and visit http://learnfre.blogspot.com. We always appreciate your advises and comments.

Tuesday, September 24, 2013

Horizontal Floating Social Sharing Bar For Blogger

Hello EveryOne! Today is my first post on my blog. So i shared Floating Social Sharing Horizontal Bar For BlogSpot. So i hope You enjoy it.


Social Networking websites has become the center of the activities of the internet because it able to attract each and every user who using internet either from schools, offices or homes. Now days People love to Share stunning article with the Social community which benefits everyone altogether. It’s vital for every blogger and webmaster to integrate Social Sharing or Like button in their Blog, so their visitors can share their stories on finest social networking website, this will not only give them coverage but it will also build loyal readership. There are unlimited Social Share widgets which are available on various blogs, but they either lacks in counting button or they are not designed well.

LIVE PREVIEW: I am quite sure you would adore previewing the Floating/Scrolling Social Sharing Buttons, so don’t feel shy just Scroll This Page down a little bit, and you will be able to see Social Buttons scrolling along you at the top of your Screen (In this Site).

Features of RB Floating/Scrolling Social Sharing Horizontal Bar For Blogger:

  • The most impressive feature of this widget is that, it scrolls along with your screen like a small sticky bar.  
  • It starts scrolling from where it is placed in your blog and float till the comment section.
  • It has Facebook Like, Twitter Share and Google+ 1.
  • It is built with ultra-fast Jquery and CSS so you will not notice any sort of speed issues.
  • You can use this Plugin in 99 Percent of Blogger Template without facing any difficulties.

How To Install It in Blogger BlogSpot Blog:


The steps are created in such a way that each and every visitor can easily follow then without facing any problem whatsoever, so just follow the instructions as mentioned below.

STEP#1: Adding the Jquery Plugin In Blogger Template:
  • Go To Blogger.com >> Your Blog >> Template
  • Now Backup your template.
  • Then select Edit HTML >> Proceed
  • Don’t forget to Click/Tick the Expand Template Widgets box.
  • Search for and just above it paste the follow HTML + JavaScript + CSS code.


STEP#2: Adding the CSS of Horizontal Social Sharing Button in Blogger Template:
  • Now let’s add this code, Search for ]]> and just before/above it paste the following coding.
.sharertitle {
float: left;
border-right: 1px solid #d2d2d2;
padding: 0px 4px 2px 0px;
margin: 0 0px 0 0;
font-family: 'Oswald', Arial, Helvetica, sans-serif;
text-transform: uppercase;
line-height: 25px;
vertical-align: middle;
font-size: 14px;
}

.t-share
{
float: left;
width: 115px;
border-right: 1px solid #d2d2d2;
margin: 0 15px 0 0;
padding: 3px 0 2px;
height: 25px;
}

.fb-like {
float: left;
width: 115px;
border-right: 1px solid #d2d2d2;
padding: 3px 0 2px;
height: 25px;
}

g-plusone {
padding: 3px 10px 2px 0px;
}

STEP#3: Adding the Horizontal Social Sharing Button in Blogger Template:
Now let’s add the final chunk of code, Search for and just before/above it paste the following coding.


Socialize It →