Showing posts with label Template. Show all posts

Friday, September 27, 2013

4 amazing New Improvements to Blogger Template HTML Editor

Google Blogger has just updated the Blogger Template HTML editor, and added four new features to make your experience even better! Now, whether you're a casual blogger, or a geek who likes tweaking his blog's template every now and then, this is place you now want to be! Check out these latest features now!


The Blogger Template HTML editor lets you edit your website's source code, and tweak it to your liking. If you know HTML, CSS and/or JavaScript, you can fully customize it to your preference. The sky is really the limit if you know what you're doing.
To get to this HTML editor, go to your Blogger dashboard, and open the blog you want to customize the template. From the Blog dashboard, click on the Template option from the left sidebar, and then find the Edit HTML button.
Edit Template HTML

What's new with the Template editor?

The new features are centered more towards user-friendliness (or rather, programmer-friendliness) and aim at boosting productivity. Previously, the Template HTML editor was much like the shapeless, bland HTML editor you get with Blogger posts (not that I'm complaining, it's a good way to keep things fast and simple).

But editing posts is one thing, and editing a template is quite another. One often had to download the code (I know I had to), make changes to it in a more comfortable editor (such as Notepad++), and then upload it again, just for the sake of keeping track of things more easily. Now I am no expert, but testing out your website or blog this way is one hell of a job. And unless you wanted to spend the whole day just making your posts look more presentable, you needed a better solution.....

.....which, by the way, has finally arrived! Blogger has made the template HTML editor much more comfortable to use by adding the following features.
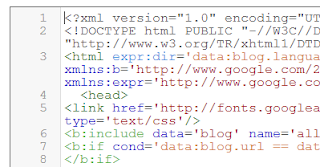
  • Line numbering - Now, you can see line numbers on each line, making it much much more easier to spot errors and keep track of your code.
  • Syntax highlighting - Much like in advanced code editors, you can now see syntax highlighting. The editor will actually color code different objects in your source to make it much more readable.
line numbering and syntax highlighting
  • Auto-indentation - I love code editors that auto-indent code for me so that I won't have to press all those extra Tabs and Spacebars. But more than that, this feature helps you keep your code organized, and you can easily keep track of what belongs where. For example, you can easily figure out what's inside your div tag, or what have you included in a list etc. You can see auto-indentation coming into action while you're writing some code. Blogger template editor will automatically put in the spaces for you. You can also use the Format Template option to clean up the indentation of your entire template.
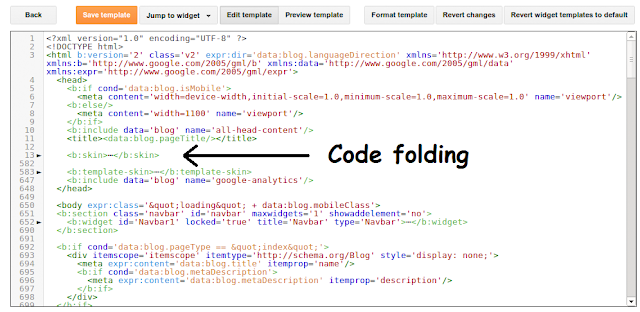
  • Code folding - I love this option too. Once I'm done with a particular piece of code, such as a div tag, I can simply fold the code, and not have to look at that large chunk of code again. You can see this from the image below. If you follow to where the arrow is pointing, you will see a small, grey arrow (?) next to line number 13. And if you look at the line number below, you will see 582, which means that the editor just saved me from having to scroll down through 569 lines of code!
Code folding and auto-indentation
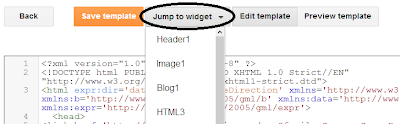
  • Jump to widget - Now, you have a quicker way of jumping to particular section of code in your template - code that belongs to a widget. Just click on the Jump To Widget button at the top of the editor, and you can see a list of all widgets you can jump to. Clicking on any will take you to the respective section in code.
Jump to widget
Like these new features? Tell us what you think about them in the comments section below. And as always, feel free to ask questions. Peace :)
Sunday, September 22, 2013

How to Give Your Blogger Template Rounded Corners

  • Adding css is really easy with the new Template Designer. Simply click on the design tab in you Blogger admin, next go to the Template Designer, once it loads click on the Advanced tab, and at the bottom of the element list you will find the "Add CSS" option.
    The code below will add roundedness to the main container.
    div.content-inner {
    -moz-border-radius: 10px; /*Firefox*/
    -webkit-border-radius: 10px; /*Safari & Chrome*/
    -khtml-border-radius: 10px;
    border-radius: 10px; /*Standard CSS3 declarations & IE9*/
    }
    The class content-inner is how we target the container div and the three declarations will cover all the major browsers as noted in the css comments.
    This will create symmetric rounded corners, however if you would like to define each corner individually the standard css parameter short hand structure applies and the other possible options are:
    border-radius: TOP-LEFT TOP-RIGHT BOTTOM-RIGHT BOTTOM-LEFT;
    If you would like to know more about available rounded corners and borders, as well as browser compatibility for each case there is a good summary here.
    Following the code above you can now also round the header's corners:
    div.header-outer {
    -moz-border-radius: 10px; /*Firefox*/
    -webkit-border-radius: 10px; /*Safari & Chrome*/
    -khtml-border-radius: 10px;
    border-radius: 10px; /*Standard CSS3 declarations & IE9*/
    }
  • Template with rounded corners

    Before and After Screenshots


    Template without rounded corners
  • Dealing With Old Browsers

    Now for the tricky part. As mentioned before using CSS3 has the unfortunate downside of not being supported by older browsers (mostly Internet Explorer, all the way up till version 8). Now there are two choices - either provide a fall-back solution or accept the fact that the page will look different in less capable browsers.
    For quite a while now there has been a growing trend to actually do the latter. Just like we provide progressive enhancement for JavaScript functionality, same approach can be taken with CSS. Rather than create a pixel perfect, lowest denominator design across all browsers, we us the optimal way for achieving the desired effect, and allow he design to degrade gracefully to a simpler version.
    Alternatively if you would like to dazzle your old-browser-fashioned audience you can use JavaScript and/or extra markup and images that would work everywhere. You could try using Curvy Corners or Spiffy Corners.

Wednesday, August 21, 2013

Install Blogger Template tutorial

It's very easy to Install a new Blogger Template But the Newbie Bloggers make a mistake in this way they lose all their blog post.In this sort of situations, I am going to teach you a Tutorial to How to Install Blogger Template. Uploading process of the Template needs the following Steps:
  1. Backup of the Template.
  2. Installing it Correctly.
  3. Downloading the Backup template.

How to Backup Blogger Template:

  • First of all Go to Blogger Dashboard.
  • Then click on the Template Tab as shown below.
Template   
  • Seen to the page at the Uppermost left part you will See "Backup and Restore Tab".As shown below.
Backup


  • Now click on the Download Full Template Tab.
  • You will see a file in the Download Directory with .exe extension.
  • Thats it you have done the Backup Process.

How To Install Blogger Template:

  • Go to Blogger Dashboard.
  • Click on the Template Tab over there.
  • Then click on the Backup and Restore Button.
  • A box will pop up with a tab to "Choose Files".
  • Click on it.
  •  Upload it a .XML extension template.If the template is in Zip or other format then extract the files through Winrar.
  • Click on the upload thats it.

Monday, July 9, 2012

Blogger Background Image - How to Add or Change in your Blog Template

In today's Blogger tutorial (Blogspot tutorial) I will show you how to both add a background image to a Blogger template if you don't have one already or change the existing background of your Blogger template.

I have chosen to write this article not because there aren't any how to articles already on the net but because they assume quite a bit of knowledge. I have taken a different tack with this post in that I assume you are an absolute beginner with no knowledge of Blogger templates.

For this reason I have provided some sample backgrounds for you to play around with. By just cutting and pasting these images you can see first hand how dramatically adding a different background to your Blogger template can change it. You will see that replacing your background image with these images isn't that difficult and hopefully it will give the confidence to branch out further and change the background of your Blogger template to suit your own needs. All that is needed is to insert a small snippet of code into the CSS styling section of your Blogger template and hey presto your Blogger template will take on a whole new look.

How to Change the Color of a Blogger Background (Default Templates)
If you are using a default Blogger template then you already have the option to change the background color to your own taste by going to Layout > Fonts and Colors. Some third party custom Blogger templates have this option too but by no means all.
For instructions on changing the background color of custom templates see tips and troubleshooting below.

How to Add a Background Image to a Blogger Template
  1. Log in to Blogger if not already logged in
  2. Go to Layout > Edit HTML
  3. Back up your Blogger template as a precaution by downloading the full template to your computer
  4. Find the following line in your Blogger template
    body {

  5. Add the following line directly after this line
    background-image: url(URL address of your image);

    Your block of code will now look like this:
    body {
    background-image: url(URL address of your image);
    (existing code in this block)
    }

  6. Now replace the code in red for the URL address of your image. Choose an image from the selection below to practise with or use your own image. Note if using your own image make sure you read the tips and troubleshooting section below.


    https://blogger.googleusercontent.com/img/b/R29vZ2xl/AVvXsEjmjo5jDq9tUnIOcLmrWyYG4qKPo_uEaNFlhEVjoIWEXt2_vRfJXDmRFbZlvMeTP0yHlg4n7O824g_96Wn3zzXbVLtj1-kg4w-_DNx2i1QmjkFRXZE1U72lp0bX3vcXTT1CVTBe5RjuzFs/s320/background_047.gif


    https://blogger.googleusercontent.com/img/b/R29vZ2xl/AVvXsEhunTFJdNTNic2Znj7PDYULkpuY76X3aCWTPUo6_IpypK4kIdCbRbsAOnvW_0celSIBzKMjPvCAW8hbbybFDJxJMny396mI_jSooSXU4knOQT22JRgVCPgSvxm3uTZWeDSGilEG_UayZX0/s320/background_104.gif


    https://blogger.googleusercontent.com/img/b/R29vZ2xl/AVvXsEhW16Gtm_Cofq3IrYoFarkNtU6FtbgItR0cIftpTb98ZjKv5KzwGxpS4dzJCs7u_oRPDKZ5ojN5oI3zQlKLgJox6hnZ2zAR3-Y1ElC-WtMGtEEb-eFp-q3AdMgySa9uTpzSAlMKmbNrPOk/s320/background_126.gif


    https://blogger.googleusercontent.com/img/b/R29vZ2xl/AVvXsEgdofU8LP-IKqv7tqPPqlavgU_bSK23YWZx8w3bUo9nKibYyuk9MgK25DB0_S2ej-wpeKAEoyBjky7Wkhx1VM4sYFxyCmevZUudgSf5VM27FDQq6FYAgHbPvJSe1wPc8V8674CxK8TzWJk/s320/background_073.gif


    https://blogger.googleusercontent.com/img/b/R29vZ2xl/AVvXsEj-FSUz69ZG9tsmnz2BKKWklouRf4rc5-_uMYYKIc0jWzqP06b25TIMR-GTXtuPFBnq9OkfYJyXkvQ-OV9hTu0JcN8TNuyszK7XWMjJOF965wO-9aNEOa5oJOUqplR3t2KpY1jEQutK5Xc/s320/background_083.gif

    Green Paws Background

    https://blogger.googleusercontent.com/img/b/R29vZ2xl/AVvXsEhj2BjJ7cSA7rE_GoF29WJoMuoauMsXzGzk1WWEeD8Ybu3NcQmf0uT2DgVqtq3nGVGm8z3MtblWSCy1wFPweIWSCLwEOayOfzWRHd3E9dLSbxeJ4cTi5GAE1KHmcE5jJ_zdQDswqzRH-8A/s320/green-paws.gif

    Musical Notes Background

    https://blogger.googleusercontent.com/img/b/R29vZ2xl/AVvXsEir92nDLOjytmyEjndzcccOitP-nmpep7d3o1iq0r5la1DF7NrFCH5A2inlaYcuJSMTQklN5RpKSj2HhhuKr9iSIyc3IoPLyxiq5XMqAMLJaOxvGH0OGc5pjhKBtRd15R7OXSWpafeaAio/s320/melody.gif

  7. Use the Preview button to see the effect of these different backgrounds on your template. It will help you get an idea of the kind of possibilities out there.

  8. You are welcome to use one of the above Blogger backgrounds as they are all free to use without any restriction. If you decide to use one of these simply click on Save Template and you are in business. Alternatively go ahead and find your own background image on the net and follow the instructions below to insert it into your Blogger template.
Tips and Troubleshooting
  • To Add Your Own Image to a Blogger Template
    There are huge number of backgrounds on the net that are suitable for Blogger. Search under free website backgrounds in your favorite search engine to find these.

    Simply download your preferred background and save to an image service like Photobucket, Flickr.

    Make sure the file format is either a .jpg, .gif or .png and that its size does not exceed 100kbs. As a rule of thumb an image size of around 30kb or less is about right if loading time speed is not to be compromised. Larger images can be resized quickly by using an online resizing service such as Shrink Pictures.

    Follow the instructions above to change the URL to that of your image.
  • To Change the Background Color of Your Custom Blogger Template
    If there is no option to change the background color of your Blogger template in Layout > Fonts and Colors you can still change the color manually.

    1. Follow steps 1 to 4 as above

    2. Find the line beginning with :
      background-color: #

    3. The hex color will be different for each template. We will change the color only
      background-color: #change hex color code to your chosen color;

    4. Replace the existing hex color code with the value of your chosen hex color. List of web safe hex colors. For example insert the following code to change the background color to:

      Denim Blue
      background-color: #336699;

      Black
      background-color: #000000;

      White
      background-color: #ffffff;

    5. Use the Preview button to see the effect of each color before you save it.

    6. Once you are satisfied go ahead and click on Save Template
Today's Blogger tutorial (Blogspot tutorial) aimed at Blogger beginners continues the series on CSS styling for Blogger. You have learned how to add the background image to your Blogger template or change the existing background image. To help you gain confidence in changing the background image I have provided some sample images for you to practise with.
Also in this Blogger tutorial you have learned how to change the color of your Blogger background if you prefer a plain solid background color rather than a background image. As always if you strike any problems implementing the tips in this tutorial please let me know.

Friday, June 29, 2012

Add CSS Styling to Blockquotes in a Blogger Template

Today I continue the series of Blogger tutorials (Blogspot tutorials) by showing you how to apply CSS styling to blockquotes in a Blogger template.

Today's tutorial on Blogger blockquotes will be useful if you are using a default Blogger template or a third party custom template. It will show you how to change your blockquote area in the following ways:

  • Add a background color to the blockquote
  • Add a border around the background of the blockquote
  • Add or change the color of the blockquote text
  • Add or change padding around the text
  • Add or change the margin
  • Add a background image

Blogger beginners you can relax as I have written this Blogger tutorial with you in mind. I will walk you through the steps of styling the blockquote section and you will see that it is not as daunting as it first appears. This Blogger tutorial assumes no knowledge of CSS styling. I have rated the difficulty level as easy to medium because it does involve making adjustments to your Blogger template.

How to Change the Blockquote Section of a Blogger Template

First of all let's take a look at the CSS Styling for the blockquote section of a default Minima Blogger template.

.post-body blockquote {
line-height:1.3em;
}

.post blockquote {
margin:1em 20px;
}

.post blockquote p {
margin:.75em 0;
}

As you can see the blockquotes area of this Minima template has minimal styling. Apart from line height and margin indentation there has been no additional code added to improve the look of the template.

Minima Blockquotes No Extra CSS Styling
Let's go ahead and give the blockquotes in your Blogger posts some styling. I will use the Minima template to show you but you can do the same for another default template or custom template. As always back up your Blogger template by downloading it to your computer before you begin to make any changes.

  1. CSS Styling to Add a Background Color to Blockquotes
    Adding a background color to the blockquote area can be achieved in 1 of 2 ways.

    1. One way is to enter the hex color directly into the styling as I have done below. This code will add a light grey background to the blockquote area.

      .post-body blockquote {
      line-height:1.3em;
      background-color: #cccccc;
      }
    2. Another way to add a background color using CSS styling for the blockquote area is to make use of the variable names already set up. The border color is light grey #cccccc by default in a Minima template. The advantage of this option is that if you decide to change the border color under Layout > Fonts and Colors the blockquote color will automatically change to the new color too.

      .post-body blockquote {
      line-height:1.3em;
      background-color: $bordercolor;
      }

      If you wanted the background color to be the same as the blog title color rather than the border color you would write this instead

      .post-body blockquote {
      line-height:1.3em;
      background-color: $titlecolor;
      }
  2. CSS Styling to Add a Border Around Blockquotes
    You have your background in place now let's add a narrow border around the background to add some more definition. The following will add a 1px solid border around the outside of your blockquote area in your Blogger posts.

    .post-body blockquote {
    line-height:1.3em;
    background-color: #cccccc;
    border: 1px solid #cc6600;
    }

    or if using variables

    .post-body blockquote {
    line-height:1.3em;
    background-color: $bordercolor;
    border: 1px solid $titlecolor;
    }

    Blockquotes With a Background and Background Border
  3. CSS Styling to Add Padding Around Blockquotes
    Now if we were to leave the styling at this point one of the problems would be that the text would butt up against the background which is not a good look. To create some space between the text and the background edge all the way around we use CSS styling to add some padding like this:

    .post-body blockquote {
    line-height:1.3em;
    background-color: #cccccc;
    border: 1px solid #cc6600;
    padding: 20 px;
    }

    or if using variables

    .post-body blockquote {
    line-height:1.3em;
    background-color: $bordercolor;
    border: 1px solid $titlecolor;
    padding: 20 px;
    }

    Blockquotes With a Background, Background Border and Padding
  4. CSS Styling to Add or Change the Text Color of Blockquotes
    If you want to accent your blockquote area in your posts one effective way to do this is to make the blockquote text color a different color from the text color of your pages. We do this by picking a color and adding the following line to the code:

    .post-body blockquote {
    line-height:1.3em;
    background-color: #cccccc;
    border: 1px solid #cc6600;
    padding: 20 px;
    color: #cc6600
    }

    or if using variables

    .post-body blockquote {
    line-height:1.3em;
    background-color: $bordercolor;
    border: 1px solid $titlecolor;
    padding: 20 px;
    color: $titlecolor;
    }

    Blockquotes With a Background, Background Border, Padding and Change of Text Color

Tips and Troubleshooting
If you want to add further modifications to the blockquotes area of your Blogger template here are several other possibilities.

  1. CSS Styling To Change the Margin of Blockquotes
    You can increase the margin from 1em to 1.5em by changing the margin line to
    margin: 1.5em 20px;
  2. CSS Styling to Add a Background Image to Blockquotes
    You can have your own image as a background in your blockquotes area of your posts by adding this line:

    background: url(http://URL of your image.jpg);

In today's Blogger tutorial (Blogspot tutorial) you have learned how to add CSS styling to the blockquotes area of your Blogger posts.
 I have shown you how to add a background, a background border, change the text color, add padding, change the margin and add a background image to the blockquotes code block.
 If you have a moment please let me know how you got on customizing your own Blogger template.


How to Remove or Change the Blog Title Border in Blogger (Blogspot)

In this Blogger tutorial I discuss how to change the blog title border color or remove the border in a Blogger template (Blogspot template) by changing either the CSS styling of the border manually or by using the Blogger Template Designer feature.

Lots of bloggers have updated their Blogger template to the new default series of Blogger templates for 2010. There are however many of you who are still using the default Minima template from 2006 (and there are lots of good reasons to do so) so this tutorial is for you and anyone else who is using a custom Blogger template based on Minima.

Remove or Change the Blog Title Border in Blogger (Blogspot)
There are two simple ways to remove the border around the blog title in Blogger. We are going to hide the border rather than actually remove the code that creates it by making the border color transparent. I will also show you how to change the border color.

Method 1 discusses how to do this using the Blogger Template Designer while Method 2 describes how to change the blog title border manually by changing the code.


Method 1 - Using Blogger Template Designer
  1. Log in to Blogger
  2. From the Dashboard go to Design > Template Designer
  3. Go to Templates > Advanced > Border Color

  4. Choose the down arrow color picker to activate the color palette window
  5. Choose transparent which is below the color palette to remove the border around the blog title completely. You now will see the blog title border disappear. Or choose a new color from the color palette to change the color

    Remove Blog Title Border in Blogger
    Remove Blog Title Border

    Change Blog Title Border Color in Blogger
    Change Blog Title Border Color
  6. Click on Apply to Blog to save your changes


Method 2
If the Blogger Template Designer is not working on your template for some reason you can tweak the code in your template to remove the border around the blog title

  1. Log in to Blogger
  2. From the Dashboard go to Design > Edit HTML
  3. Back up your Blogger template
  4. Find the border color variable which will be near the top of the template code

  5. Change the border color value to transparent to remove the border altogether so that your code now looks like this:

    type="color" default="#ccc" value="transparent">

    or change the value to a color of your choice eg

    type="color" default="#ccc" value="#ff7f00">
  6. Save your template and view your blog to see that the border around the blog title has been removed or changed color

    Remove Blog Title Border CSS Styling in Blogger


Tips and Troubleshooting
Below are some tips to help you further customize the blog title border width. You can either remove the inner border, thicken the outer border or thicken both borders around the blog title in Blogger.

  1. To change the width of the border around the blog title in Minima change the following:

    #header {
    margin: 5px;
    border: 1px solid $bordercolor;
    text-align: center;
    color:$pagetitlecolor;
    }

    to

    #header {
    margin: 5px;
    border: 10px solid $bordercolor;
    text-align: center;
    color:$pagetitlecolor;
    }

    This code increases the border width from 1px to 10px
  2. To remove the inner border around the blog title in Minima change the code to the following:

    #header {
    margin: 5px;
    border: 10px solid $bordercolor; (remove this line)
    text-align: center;
    color:$pagetitlecolor;
    }
  3. To increase the width of the outer border around the blog title in Minima change this code

    #header-wrapper {
    width:660px;
    margin:0 auto 10px;
    border:10px solid $bordercolor;
    }

In this Blogger tutorial you have learned two methods to change the color of the border around a blog title in Blogger blog (Blogspot blog). I have also shown you how to increase the size of the border width. This tutorial applies particularly to the default Blogger template Minima but also is relevant for any blogger using a custom Blogger template based on Minima. Good luck!


horizontal random post

    Random Posts...!!!